Get to Know Your Epson Printer’s Scanning Options
It’s a good idea to get to know your Epson printer’s scanning features before you begin scanning. Most Epson all-in-one printers, including the EcoTank, Expression, and Workforce series, come with three primary scanning options. Knowing these options helps make scanning fast and easy. Here’s a closer look.
#1. Scanning with Epson Scan 2
Epson Scan 2 makes it easy to turn physical documents into digital copies, as it’s Epson’s official scanning tool. It provides an easy-to-use interface and dependable performance for scanning photos, documents, or PDFs quickly.
#2. Scanning from the Printer’s Touchscreen
Direct scanning via the printer’s touchscreen provides easy and immediate access to Epson scanner settings. Scan rapidly without a computer using this method, and save files straight to your device or network.
#3. Scanning with Third-party or Built-in Windows/Mac Tools
You can also scan from an Epson printer by using third-party or built-in computer tools. On Windows, you can use Windows Scan or Windows Fax & Scan. On the other hand, Mac users can rely on Preview or Image Capture—both are perfect for integrating with SwifDoo PDF for editing and saving documents.
Method 1. Epson Scan to Computer Using Epson Scan 2
Epson Scan 2 gives you access to both basic and advanced scanning features. You can scan your document and save the image in multiple file formats. Use your operating system's Documents, My Documents folder, or open it in your scanning program. Thereafter, you can preview the scanned image and adjust settings as needed.
Learn how to scan from an Epson printer to a computer using the Epson Scan 2 with ease.
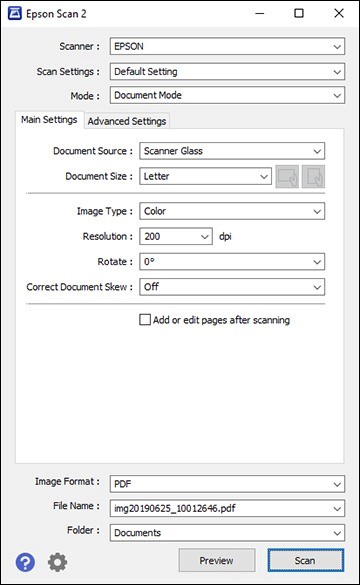
Step 1. Start Epson Scan 2. You’ll see a window on the screen.
Step 2. Select the Mode, Document Source, Document Size, and Image Type. Similarly, adjust the Resolution, Rotate, and the Correct Document Skew options.
Step 3. Once done, click the Preview button. Epson Scan 2 previews the original document and automatically displays the results in the Epson Scan 2 window.
Select any additional settings in the Main Settings tab. Then, go to the Advanced Settings tab and select the settings you want.
Step 4. Choose the format in which you want to save your scanned file. If necessary, select Options, then choose the desired format options.
Enter the file name and select the storage location. Finally, click Scan to have the product scan your original and save the scanned file to the location you specified.
![Full Guide on How to Scan from Printer to Computer [Windows/Mac]](https://img.swifdoo.com/image/how-to-scan-from-printer-to-computer.png)
Full Guide on How to Scan from Printer to Computer [Windows/Mac]
Wish to scan from the printer to your computer? Learn the best ways on how to scan from printer to computer on Windows and Mac.
READ MORE >Method 2. Scan to Computer Directly From the Epson Printer Control Panel
Another method is to perform an Epson scan to computer directly from the printer’s control panel. It’s a quick and convenient option when your printer is already connected to your computer or network.
Check out how to scan to a computer directly from the Epson printer control panel in a few clicks.
Step 1. Place your original document on the product for scanning. Alternatively, to scan a double-sided or multi-page document, place your original in the ADF.
Note. Ensure you’ve installed the product software to enable scanning from the control panel. Thereafter, restart your computer to enable scanning from the control panel.
Step 2. Press the Home button if necessary. And select Scan.
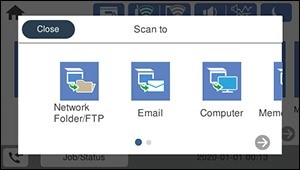
Step 3. Select any of the Scan to options, such as:
- Network Folder/FTP - Saves your scan file to a pre-defined folder on a network computer or FTP server.
- Email - Lets you send scanned files via a preconfigured email server.
- Computer - Enables scanning to a connected computer using the saved scan settings.
- Memory Device - Saves your scan file on a USB device and lets you select the file format, quality, and other settings.
- Cloud - Delivers your scanned files to a destination registered with Epson Connect.
- WSD - Manage network scanning on Windows 10, 8.x, 7, or Vista (English only).
Step 4. Follow the prompts on the screen according to your chosen option to finish scanning.
When the scan is done, select Save/Send (for email) to save the document to storage.
Method 3. Scan From Epson Printer to Computer via SwifDoo PDF
SwifDoo PDF provides a lightweight and efficient option for scanning Epson printer documents to your computer. You can easily scan to PDF and organize your documents in a single location with this tool. It also allows to scan from a printer to a computer, such as Canon printer to computer, making it highly versatile. You can edit scanned documents, make notes, or manage pages quickly using SwifDoo PDF. This method is ideal for users who need more control over their scanned files.
Here’s how to scan from an Epson printer to your Windows PC via SwifDoo PDF in a few clicks.
Step 1. Download and set up SwifDoo PDF on your Windows system. Next, connect it to your printer for scanning documents.
Step 2. Tap Create in the left pane on the homepage. And select From Scanner on the main interface.
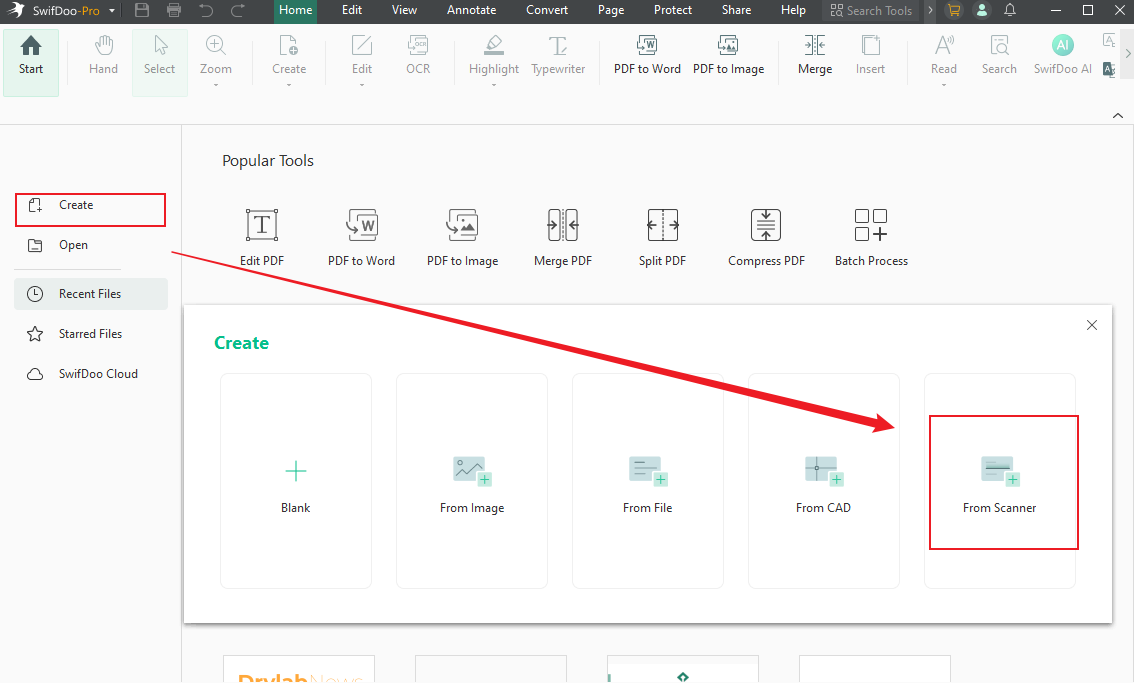
Step 3. Choose the connected Epson printer and adjust its settings. This includes modifying slides, color mode, resolution, page size, and output.
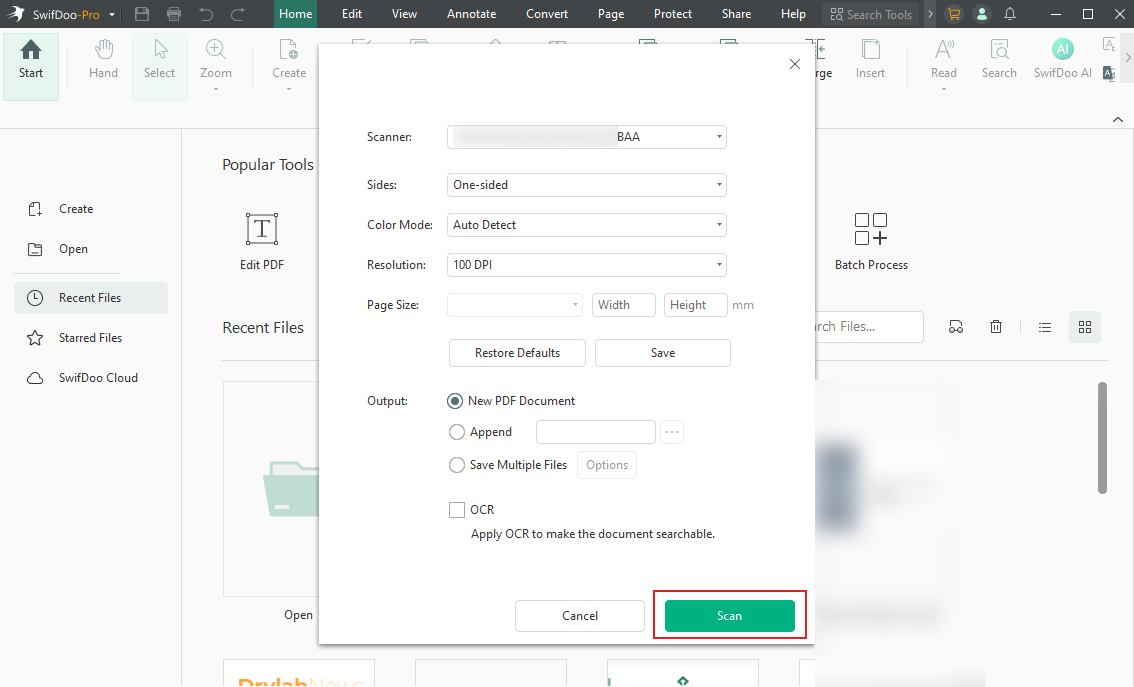
Step 4. Lastly, select Scan to begin scanning the document. If needed, you can also use the tool to edit scanned PDFs.
Method 4. Epson Scan to Computer Using Mac Preview
Mac users may also be curious about how to scan a photo from printer to computer? On macOS, Preview is a built-in app that works as a simple PDF scanner with Epson printers. It lets you scan documents, photos, or even scan a book to PDF without extra software. This approach is ideal for producing quick, sharp scans saved to your Mac. This is particularly handy for users who want a quick scanning solution without installing software.
Learn how to scan from an Epson printer to a Mac using Preview.
Step 1. Put the document on the scanner bed or feed it into the document tray. Next, launch the Preview app. Tap File in the top menu bar and click Select Import from Scanner.
Note. While the scanner is getting ready, click Show Details. This will display several options, giving you more control over your scan.
Step 2. The scanner will automatically scan your document as a preview. This will display on the left side of the import window. At the right side of the screen, you can fine-tune the scan.
Step 3. Tap the Kind dropdown menu and choose a relevant option.
- Text - Documents consisting of words.
- Black & White - Grayscale image.
- Color - Color images.

Step 4. Make the necessary amends. Settings available include Resolution, Size, Rotation Angle, Auto Selection, and Format.
Note: Adjust the image settings if needed.
Once satisfied, hit Scan. Preview will ask you to choose an area to scan. Use your mouse or trackpad to draw a box around the part of the photo you want to keep. Select Scan again to create the image with your chosen settings, then save it.
To Wrap Things Up
Scanning documents is now a vital part of organizing information at home and at work. This guide has shown you how to scan from Epson printer to computer using four practical methods, from built-in tools to advanced PDF solutions. Each option fits different needs, devices, and skill levels. With the correct approach, scanning becomes faster and smoother. Paper documents can now be effortlessly converted into digital files.