
Electronic Signature vs. Digital Signature in Bluebeam
Before you get started, you should clearly know the difference between electronic and digital signatures in Bluebeam. These two terms may be used interchangeably, but their purposes are not the same.
- Electronic Signature. An electronic signature is any visual mark, such as a typed name, scanned image, or drawn signature, used to sign documents. It is quick to create and convenient for everyday use when you need to sign PDFs without strict security requirements. Electronic signatures are usually used for quick approvals and routine document handling.
- Digital Signature. A digital signature provides a secure, encrypted form of signing that ensures identity verification. It depends on certificates from trusted authorities to verify document integrity and authenticity. Digital signatures are ideal for legal, contractual, and sensitive documents where security and verification are essential.
How to Create an Electronic Signature in Bluebeam
Bluebeam allows you to quickly add an electronic signature using multiple methods, making it easy to sign PDFs without complex setup. The process is easy and flexible for routine document requirements.
Here, we’ll cover how to create a signature in Bluebeam using easy methods like scanned signatures and stamp tools.
Option 1: Create a Signature from a Scanned Image
Using a scanned signature helps users create and add a signature image to PDF quickly and accurately. This method helps you apply your handwritten signature repeatedly across documents while keeping a professional finish.
Here’s how to create a signature from a scanned image in Bluebeam.
Step 1. Sign a white sheet of paper, scan it, and save it as a high-resolution image (JPG or PNG).
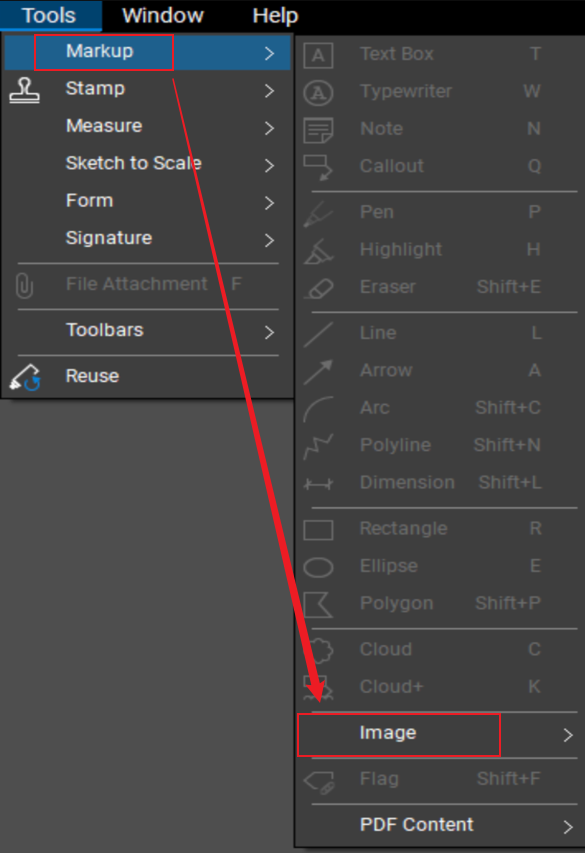
In Revu, navigate to Tools > Markup > Image > From File and select your signature file.
Step 2. Now, clean up the image.
- Click to place the image on your document.
- Select the image, open the Properties panel (Alt+P), and select Crop to remove excess whitespace.
- In the Properties panel, select Mask Color and pick white to make the background transparent.
Step 3. Right-click the signature image and select Add to Tool Chest > My Tools.
Step 4. Also, resize and drag the signature image from the Tool Chest onto your document.
Note. Before sending, flatten the image via Document > Flatten or Ctrl+Shift+F to prevent movement.
Option 2: Draw a Signature with the Pen Tool
Another effective way to create a signature in Bluebeam is by drawing it directly on the PDF with ease using the built-in tools. The Pen Tool simplifies PDF signing by allowing direct freehand signature creation on the page.
Let us learn how to draw a signature with the Pen tool in Bluebeam.
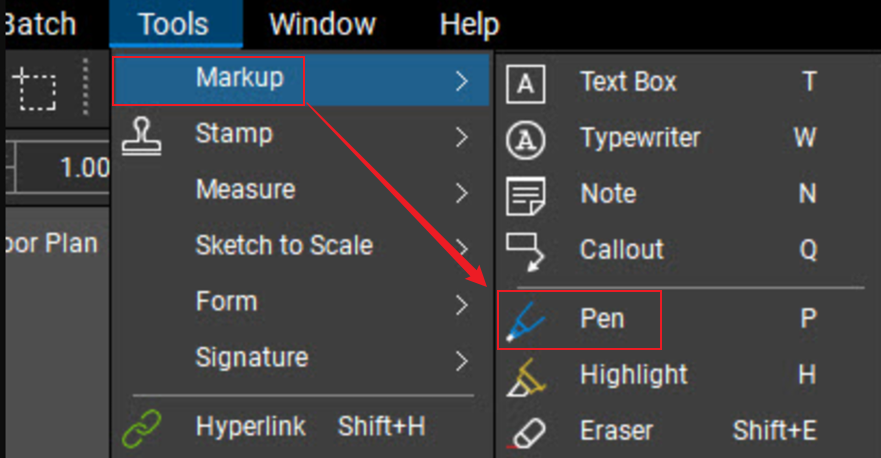
Step 1. Open Bluebeam. And go to Tools > Markup > Pen or press P on your keyboard.
Click and drag to create your signature on the PDF.
Step 2. Hold down SHIFT to draw perfectly straight horizontal/vertical lines if needed.
Tip. The markup is created after a slight delay, or press ENTER immediately after drawing to solidify the line.
Step 3 (Optional). Turn on the Smoothing option in Properties for a cleaner and more refined finish.
Step 4. Use right-click to add the newly created signature to Tool Chest > My Tools for convenient reuse.
Option 3: Create a Reusable Signature Stamp in Bluebeam
Another simple way to sign documents in Bluebeam is by using reusable signature stamps to improve workflow speed. This method helps you create and add stamps to PDFs, allowing you to apply your signature consistently across multiple files.
Find out how to create a reusable signature stamp in Bluebeam.
Step 1. Place your signature on clean white paper, scan it at 600 DPI for clarity, and export it as a .png or .jpg file.
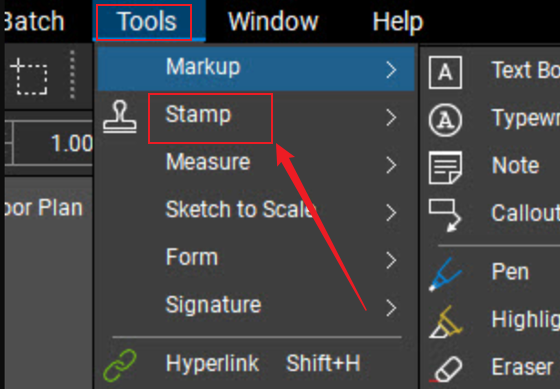
In Bluebeam Revu, go to Tools > Stamp > Create Stamp.
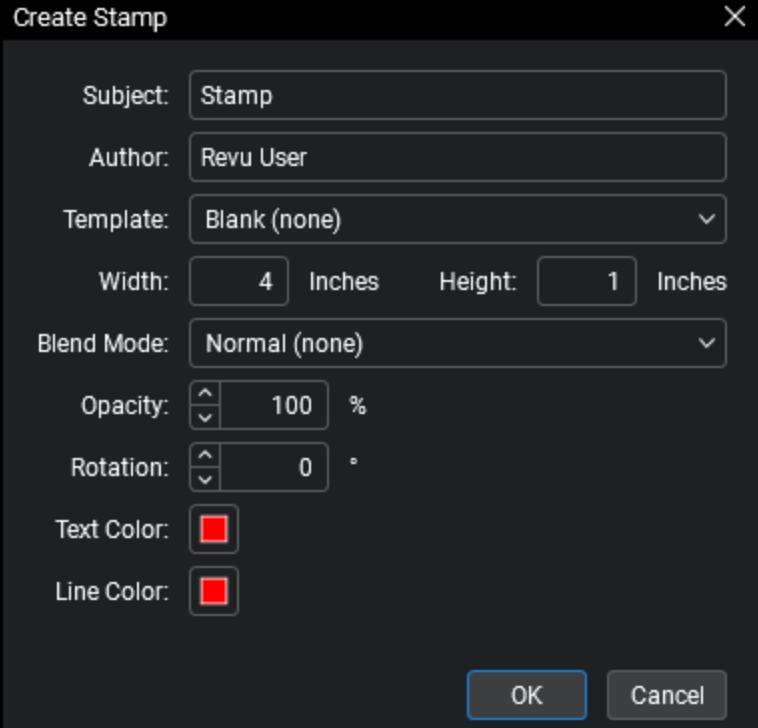
Step 2. Now, set Properties.
- Name. E.g., [Your Initials]_Signature.
- Size. A common size is 2.5 inches wide by 1 inch high.
- Opacity. 100%.
A new document tab opens.
Step 3. Choose Edit > PDF Content > Snapshot (or click the camera icon) to capture your signature image.
- Paste the image onto the stamp canvas.
- Select the signature image, then go to the Properties panel and set Mask Color to white.
- Also, increase the tolerance (e.g., to 20) to ensure transparency.
- Use the yellow handles to fine-tune the size and placement of the signature.
Step 4. Move to File > Save. You can now find the stamp in the Tools > Stamp menu.
From the Stamp menu, drag the signature onto the document or add it to the Tool Chest by right-clicking and choosing the option.
How to Create and Apply a Digital Signature in Bluebeam Revu
Learning how to create a digital signature in Bluebeam Revu is important for securely verifying and protecting documents. This section explains how to set up and apply a certified digital signature to ensure authentic, tamper-proof PDF signing.
Let us learn how to create and apply a digital signature in Bluebeam Revu.
Step 1. Create a digital ID first.
Note. A Digital ID is necessary for signing and acts as your secure certificate.
- Go to Tools > Signatures > Digital IDs to begin the setup process.
- Select Add Digital ID to begin setting up your signature.
- Choose Create Digital ID file (recommended for portability, creates a .pfx file) or Create Digital ID in Windows Certificate Store (easier, tied to your Windows login).
- Fill in your identity details (Name, Email) and set a secure password.

Step 2. Navigate to Tools > Signatures > Sign Document. And click and drag to create a signature box in the desired location.
Step 3. In the Sign dialog box, select your Digital ID. And set the Appearance (e.g., standard text or an image of your signature).
Step 4. Enter your password if prompted. Select OK, then save the document when the prompt appears.
Create and Add a Signature to a PDF Effortlessly in SwifDoo PDF
Having seen the various methods to create and add a signature in Bluebeam, the process can appear somewhat limited or complex for fast use. Certain approaches may involve additional setup, repeated changes, or reduced device flexibility. In such cases, a simpler alternative is needed for smoother document handling. SwifDoo PDF makes it easy to create electronic signatures and digital ones without unnecessary complications.
SwifDoo PDF is a simple, lightweight tool that makes document signing and editing easy. It enables users to add a signature to a PDF without Adobe, making document signing quick and easy. With an easy-to-use interface, electronic signatures can be created and applied to documents quickly and effortlessly. This makes SwifDoo PDF a practical alternative for effortless and efficient PDF signing.
Learn how to create and add an electronic/digital signature in SwifDoo PDF.
#1. Create an Electronic Signature with SwifDoo PDF
Step 1. Download and install SwifDoo PDF on your PC. Open your PDF file for which you need to create an e-signature within the program.
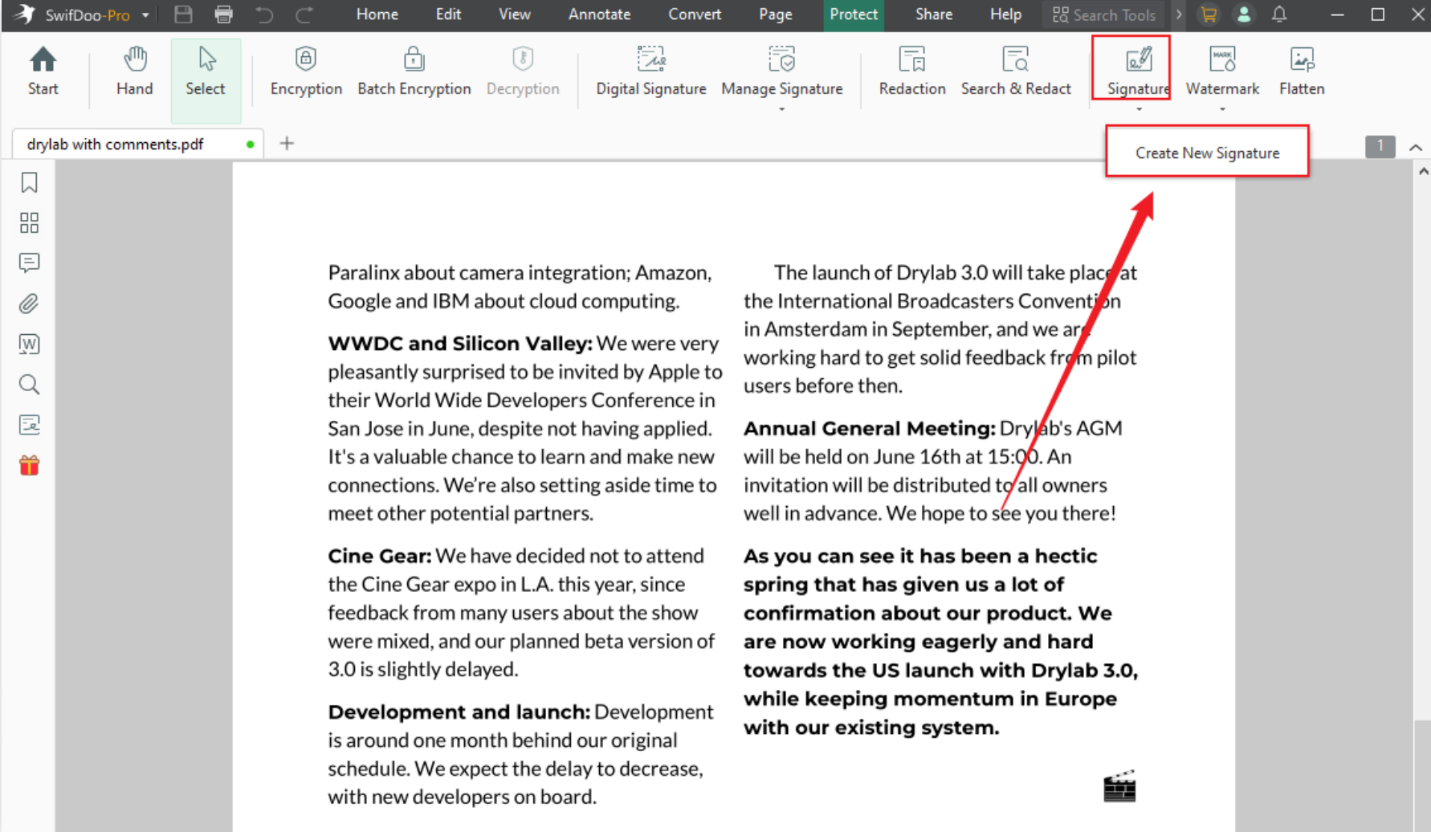
Step 2. Click Protect in the top bar and select Signature > Create New Signature in the secondary menu bar.
Step 3. Select an option such as Draw, Type, Image, or Camera, and create the signature.
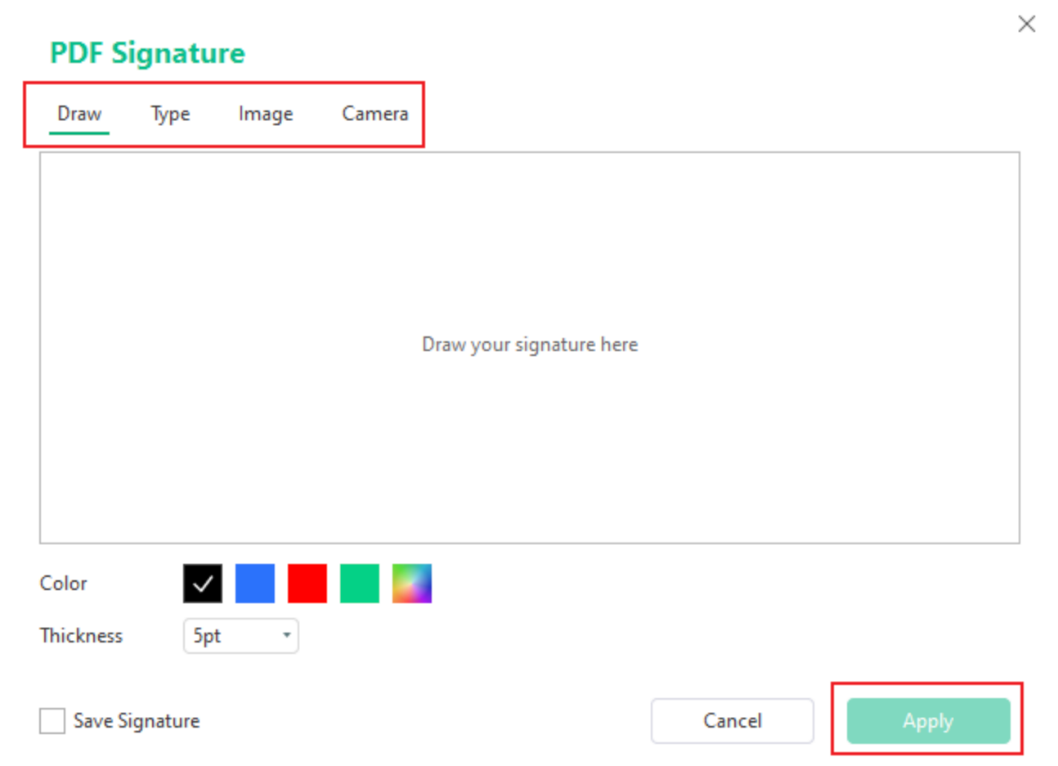
Step 4. Click Apply and place the signature in the intended place.
#2. Create a Digital Signature with SwifDoo PDF
Step 1. Launch SwifDoo PDF. And open the PDF document with the software.
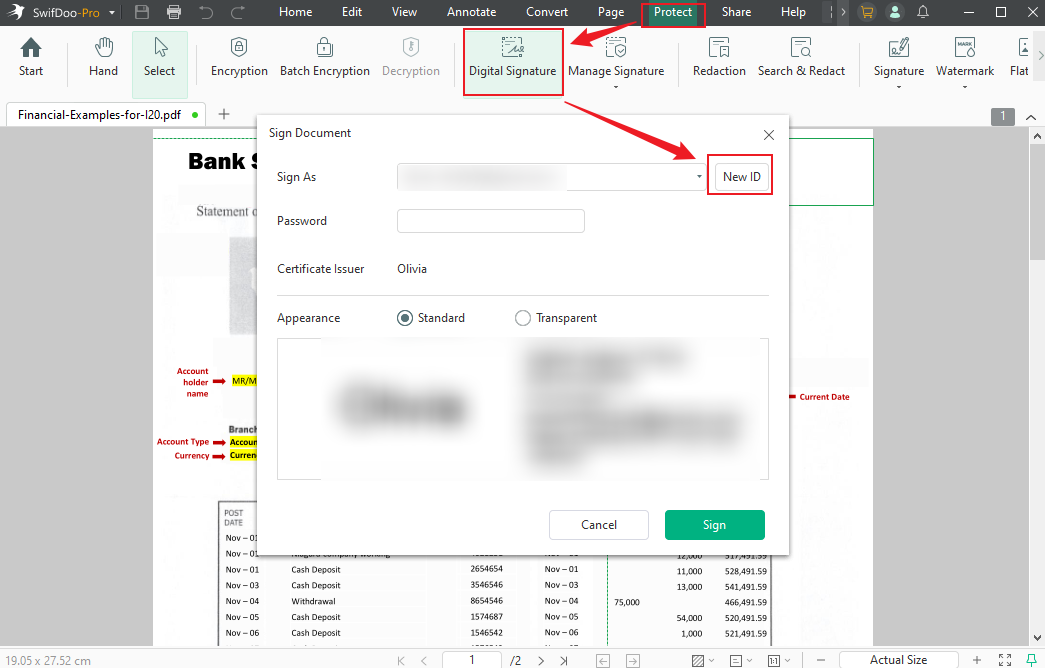
Step 2. Open Protect > Digital Signature and pick a field to place your signature. Click New ID to make the digital signature.
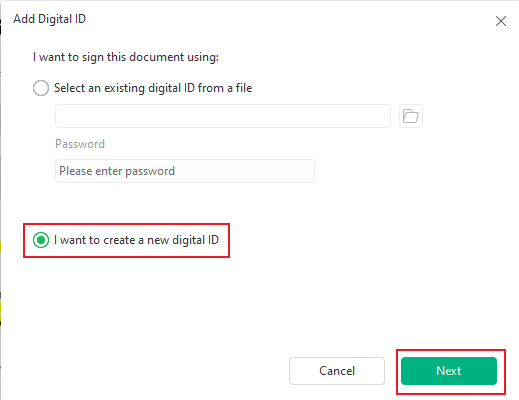
Step 3. Select the “I want to create a new digital ID” option and click Next. Follow the on-screen prompts to complete the digital signature information.
Step 4. Use Sign to complete the digital signing of the PDF.
A Quick Wrap Up
Knowing how to create a signature in Bluebeam helps you easily manage and sign documents using methods such as images, the Pen Tool, or reusable stamps. Each method ensures flexibility depending on how your workflow and security are structured. However, picking the right method can enhance efficiency by speeding up and simplifying the entire process. These options allow you to confidently complete PDF signing tasks in Bluebeam.