What Is a Hanging Indent in Word
A hanging indent in Word is a text format in which the first line is flush with the left margin, and subsequent lines are indented. Standing out in the text enables readers to efficiently scan names, sources, and critical terms. Unlike a first-line indent, which moves only the first line inward while leaving the other lines at the margin, hanging indents work well for references and citations.
The Importance of Hanging Indent
Hanging indents play a key role in creating clean, professional, and easy-to-read documents, especially when dealing with long lists or references. They assist readers in navigating the text and preserve consistency in academic and professional work.
Here’s why hanging indent matters.
- Improves readability by clearly separating entries.
- Meets formatting requirements for APA, MLA, and Chicago styles.
- Makes reference lists and bibliographies easier to scan.
- Enhances the professional appearance of documents.
- Makes managing complex or multi-line citations much easier.
How to Make a Hanging Indent in Word on Windows
If you use a PC, knowing how to create a hanging indent in Word on Windows is easy and fast with the built-in formatting tools. This approach is particularly helpful for students, researchers, and professionals who require correctly formatted reference lists or well-structured documents without manual spacing
Here are two practical ways to create a hanging indent in Windows.
Option 1. Use the Paragraph Dialog Box
The Paragraph Dialog Box is the most accurate and widely suggested method to apply a hanging indent in Word. Using the Paragraph dialog box, you can control indents precisely and ensure your document adheres to academic or professional formatting guidelines.
Find out how to make hanging indents in Word using the Paragraph Dialog Box method on Windows.
Step 1. Highlight the text in the paragraph you wish to apply a hanging indent to. Then, tap the Home tab in the ribbon.
Step 2. Next, hit the small arrow icon (dialogue launcher) in the lower-right corner of the Paragraph group.
Step 3. In the Indentation section, choose Hanging from the Special dropdown menu. Configure the indent depth to 0.5 inches, following the standard for most academic styles.
Alternatively, try the Ctrl + T shortcut to set a hanging indent instantly.
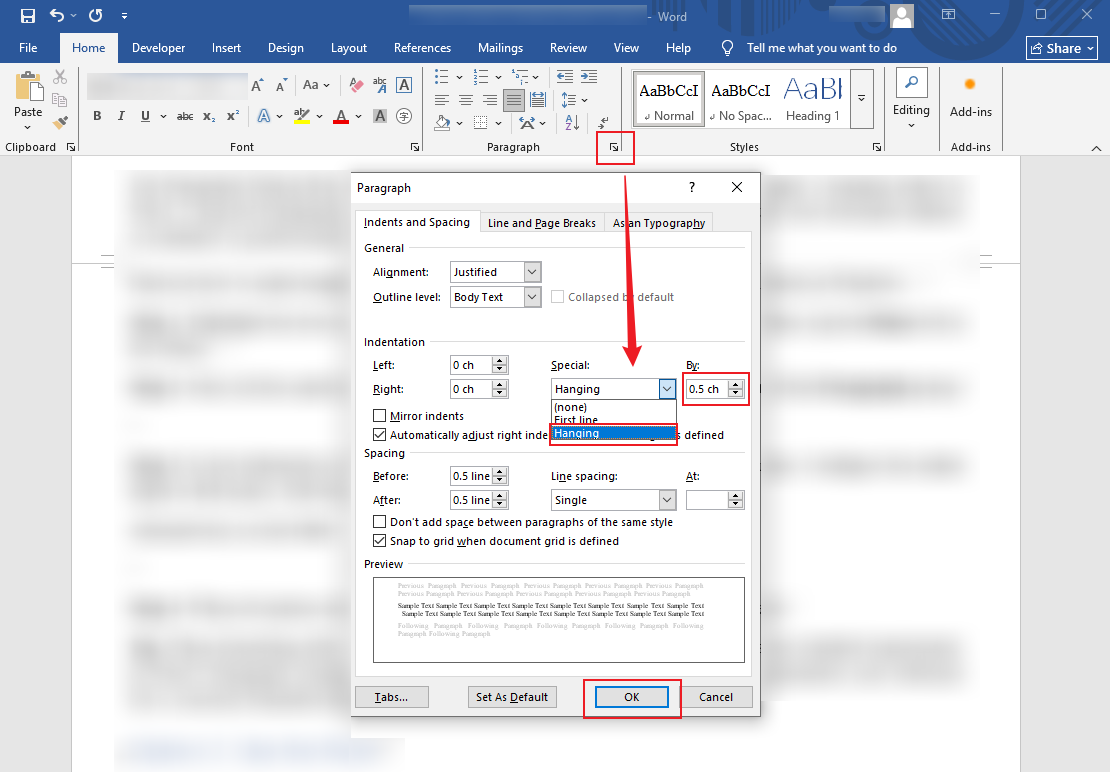
Step 4. When all options are set, select OK to apply the formatting to the chosen text.
Option 2. Use the Ruler
The Ruler offers another quick, visual approach to apply a hanging indent in Word, ideal for manual adjustments. This approach lets you move indentation markers directly, making it simple to view changes in real time without opening extra dialog boxes.
Check out how to make hanging indents in Word using the Ruler Tool in a few clicks.
Step 1. Go to the View tab and check the Ruler box to turn on the ruler tool and show it at the top of your document.
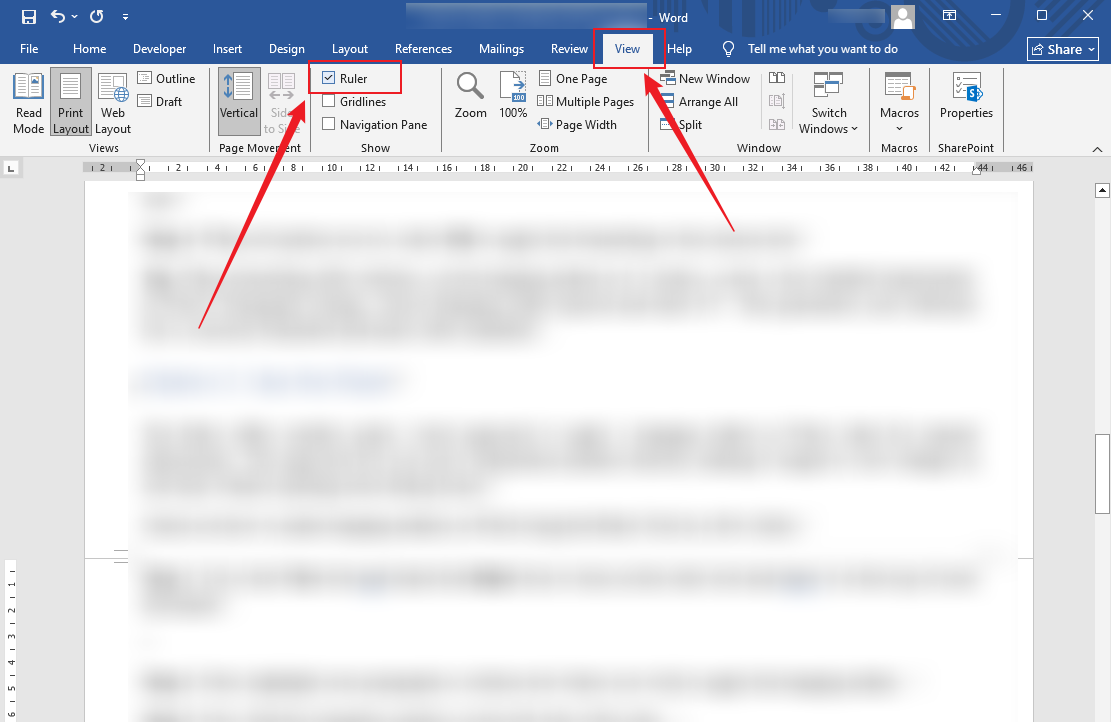
Step 2. Next, highlight your paragraph or citation text where you wish to apply the hanging indent.
Step 3. Now, find the triangular markers on the left side of the ruler.
Note. The top triangle is the First Line Indent marker, and the bottom triangle is the Hanging Indent marker.
Step 4. Drag the First Line Indent marker to the 0-inch mark. Then, drag the bottom triangular marker to the right to set where subsequent lines should begin (typically 0.5 inches). Ensure to keep the top marker at the left margin position.
How to Create a Hanging Indent in Word on Mac
On a Mac, you can set up a hanging indent in Word using the Paragraph dialog box. This method allows you to set exact indentation for references, bibliographies, or structured lists. It allows your document to look polished and to smoothly conform to academic or style guidelines.
Here’s how to make a hanging indent in Microsoft Word on Mac using the Paragraph option.
Step 1. Open the Word document and highlight the paragraph(s) where you desire to apply the hanging indent.
Step 2. Then tap the Format option and select Paragraph from the menu bar.
Step 3. Once the Paragraph dialog box appears, open the drop-down menu under Indentation.
In the Special dropdown menu, select Hanging.
Next, modify the indent size in the By field if necessary (the default is 1.27 cm).
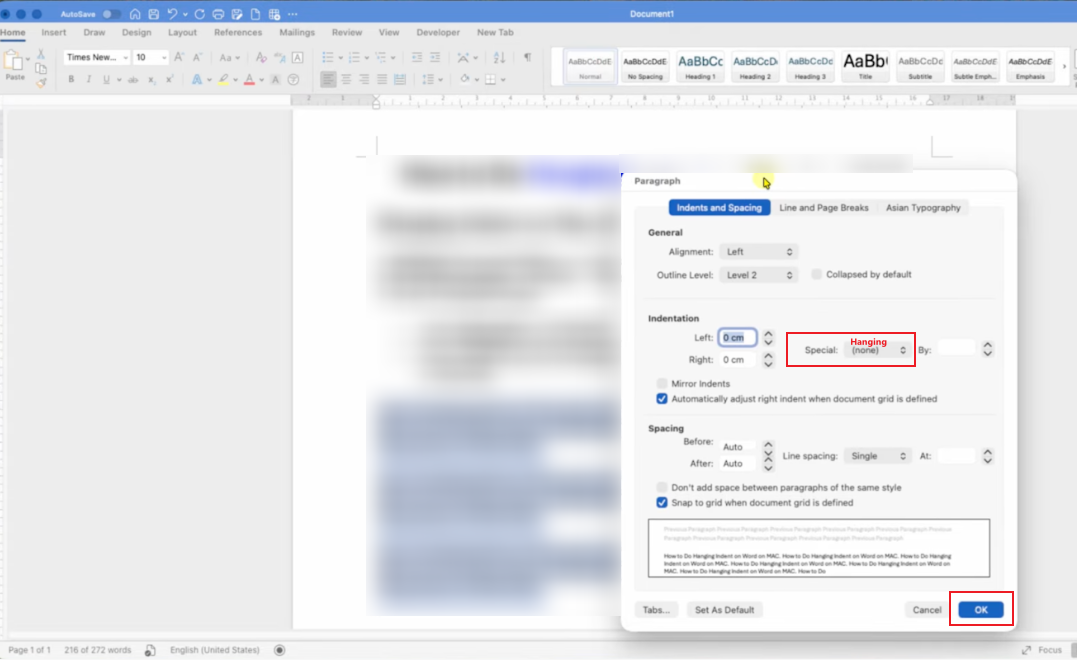
Step 4. Click OK to apply the hanging indent.
How to Do a Hanging Indent on Word Online
Word Online also supports hanging indents, making it easy to format references even when working in a browser. This option is helpful for quick edits and collaborative documents that still require consistent citation formatting.
Learn how to create a hanging indent in Word online in a few clicks.
Step 1. Highlight the paragraph(s) or citation(s) where you want to add a hanging indent.
Step 2. Go to the Home tab and click the small arrow in the lower-right corner of the Paragraph section to open the dialog box.
Note. If you don’t have a Paragraph menu in the Home tab, simply right-click the selected text and locate Paragraph Options… in the dropdown menu.
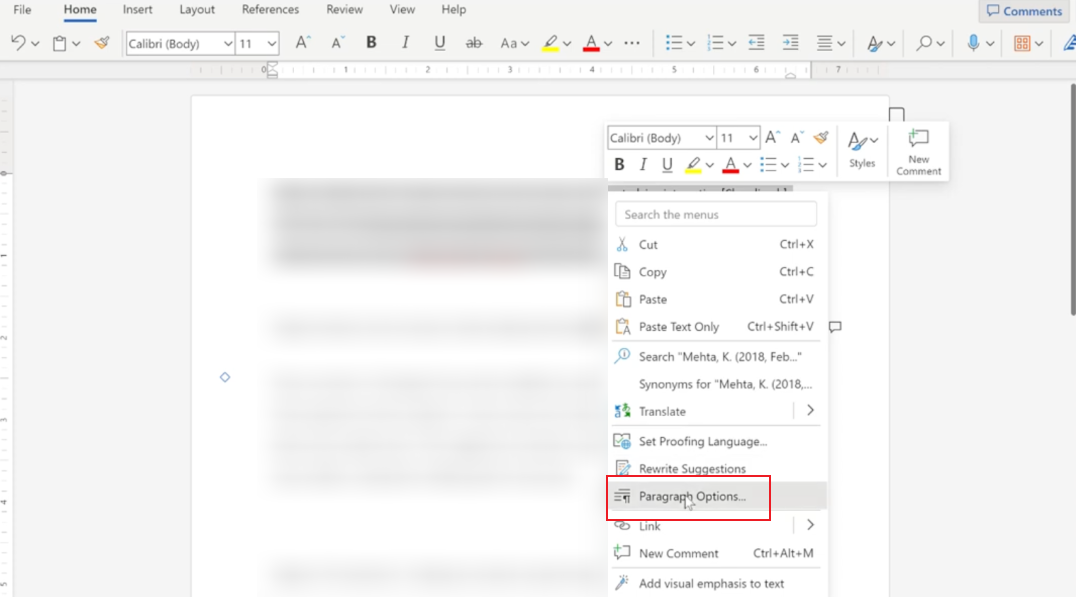
Step 3. In the Indentation section, find the Special dropdown menu. Select Hanging from the dropdown.
Ensure the "By" field is set to 0.5" (or your desired measurement) for standard formatting.
Step 4. After configuring all the preferred settings, tap OK to apply the indent.
BONUS: Professional Way to Convert Word to PDF or Vice Versa
You’ve seen different ways to add a hanging indent to a paragraph on Windows, Mac, and online. However, for professionals sharing documents without formatting problems, SwifDoo PDF remains one of the best PDF converters available.
Using SwifDoo PDF, you can convert Word to PDF without losing formatting, keeping your hanging indents, styles, and layouts intact. It also lets you convert PDFs back to Word for simple editing, turning it into a versatile tool for students, researchers, and office work. Its easy-to-use interface and rapid processing make handling documents smooth and stress-free.
A Quick Wrap Up
Knowing how to make a hanging indent in Word helps your documents look professional and comply with citation standards smoothly. Whether you use the Paragraph dialog box, the Ruler, or Word Online, these Word hanging indent methods are simple, reliable, and effective. With these tools, formatting references and structured text has never been easier. In addition, you can use SwifDoo PDF to convert Word documents to PDF without losing formatting, keeping your work professional and share-ready.