Why You Need to Password Protect an Excel File
Microsoft Excel has always remained one of the most popular spreadsheet programs since its inception. It helps users store and calculate complex data without breaking a sweat. Usually, with no protection, anyone who has access to a document can open and edit it with no limits.
In this digital era, we may often encounter information leakage. If your Excel documents contain any sensitive information, such as personal and financial data, you wouldn’t expect others to open or read them randomly. To avoid possible problems, you'd better add additional protection to your Excel documents.
In this post, we offered you a detailed guide on how to password protect an Excel file on both Windows and Mac, which can help prevent your Excel file from being stolen by accident.
How to Password Protect an Excel File within Excel
An Excel file can be protected in many ways, adding passwords to Excel files is an easy and useful way to keep outsiders from editing or stealing data in your documents. Microsoft Excel proves to be the most reliable approach, together with its built-in capabilities. Let’s dive into how to password protect an Excel file with the help of Microsoft Excel itself:
Step 1. Open the spreadsheet that you want to add a password to with Microsoft Excel;
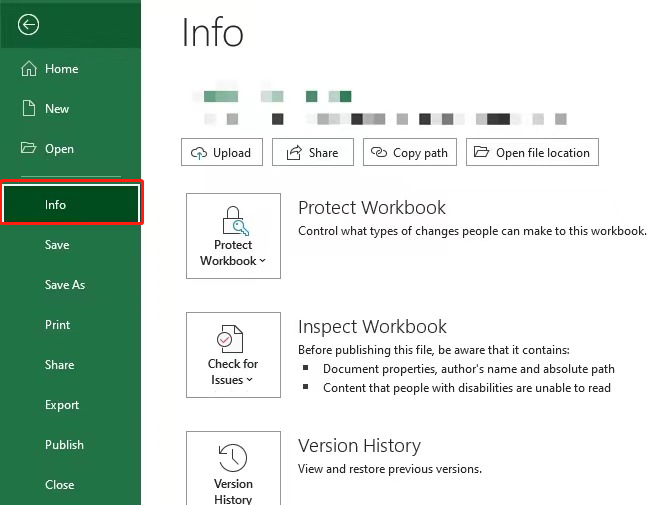
Step 2. Click File, then select Info in the left navigation bar;
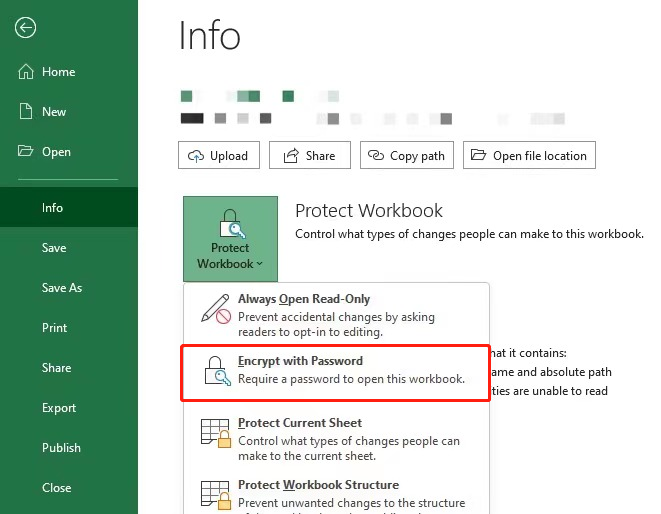
Step 3. Select Protect Workbook and click Encrypt with Password;
Step 4. Input a password and hit OK. You need to reenter the password to complete this encryption process.
Now, your Excel document has been secured successfully. No matter who wants to open the file, he/she needs to input the preset password correctly.
How to Password Protect an Excel File on Mac
If you’re running a Mac operating system, there’s another simple way that enables you to password protect an Excel file. Follow the steps below to encrypt an Excel file on Mac:
Step 1. Launch Excel and open the file you want to add a password;
Step 2. Click File in the top navigation bar and select Passwords…;
Step 3. Input your password in the File Password dialog box and click OK;
Step 4. Reenter the same password you just type before, then click OK to confirm your change.
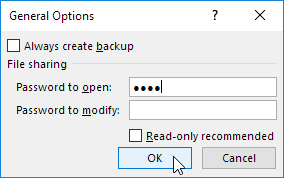
Two types of passwords are offered when you open the File Password dialog box: one is to open and the other is to modify. Remember to choose the most suitable one as per your requirements.
How to Encrypt a PDF with a Password in 6 Ways | 2025
Learn how to encrypt a PDF with a password in 6 practical ways. Apply an open or permission password to safeguard your file from viewing or editing.
READ MORE >How to Password Protect an Excel File with Your System (Window & Mac)
If you feel confused about these different ways of adding passwords to your Excel sheets, there’s also a more flexible way to achieve this which is offered by your system. When you save an Excel file, you can easily add a password to the spreadsheet in the dialog pop-up window.
Follow the steps below to password protect Excel files if you only need to restrict others from opening or editing your Excel documents.
Step 1. Open your workbook and click File > Save As;
Step 2. Choose a new category, and then hit Tools and select General Options…;
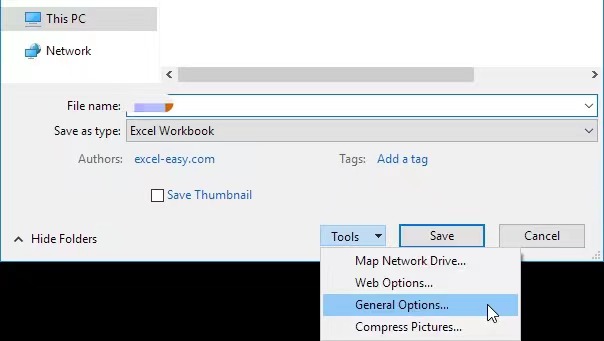
Step 3. Set a password to restrict access to opening or modifying your spreadsheet, then click OK to apply your settings.
This method of password-protecting an Excel file is much simpler and easy-to-understand for people who only have basic encryption needs. Anyone without a correct password won't open or edit the file.
Extra Security Options in Microsoft Excel
You may have noticed that Microsoft Excel also offers six different ways to password protect an Excel file from all aspects.
Adding an opening password to the document means you need to input a password every time you open it. However, if you require some less strict security options, The following methods provided by MS Excel may be of huge help:

- Always Open Read-Only
As its name suggests, if you leave this option on, your document will be opened in read-only mode by default. There is a pop-up window that asks you to choose to read or edit the spreadsheet. It’s very convenient for users who only need to check the information to avoid changing it accidentally.
- Protect Current Sheet
When your workbook contains more than one Excel sheets, you can use this feature to add additional protection for a specific spreadsheet. When adopting this protect method, viewers can only open or make changes to the unprotected sheets.
- Protect Workbook Structure
This option is designed to protect the structure of your spreadsheets. By enabling this protection, you can prevent users from changing, moving, adding, or deleting any sheet in your workbook effectively.
- Restrict Access
Restricting access to an Excel file means not allowing for certain actions, such as editing or printing. When this protecting way is adopted, you can grant people access to specific actions while removing their ability of other operations.
- Add a Digital Signature
A digital signature is a type of electronic signature. It guarantees a signer's identity to the highest degree and complies with the strictest legal regulations. Using a digital signature tells people you are the one who is responsible for this file, and no one else can make edits.
- Mark as Final
Marking your workbook as "final," indicates that the file doesn’t need to be changed anymore. All typing, editing, and proofing capabilities will be disabled because the document has been "finalized.”
Microsoft Excel itself has provided over 5 distinct methods to help users password protect an Excel file. All these methods stress different aspects and can meet almost all users’ requirements for protecting Excel files.
Guide on How to Password-Protect a Word Document on Windows/Mac
Are you trying to protect your sensitive Word document from unauthorized channels? Discover how to password protect a Word document on Windows and Mac versions.
READ MORE >The Bottom Line
It’s never a hassle to add passwords to Excel files, especially when they contain some sensitive messages. Of course, the most important thing is that you need to make sure you remember all passwords correctly. After all, it’s almost impossible to access the file without the password.