You’ll also learn about a handy PDF editor that lets everyone add watermarks quickly and easily. The native Automator application in macOS can also perform the task.
Add a Watermark to a PDF in Preview
Preview doesn't offer a real watermark feature, but it lets you add a watermark to a PDF on a Mac for free in two ways. When it comes to a watermark, there are often text and image types. Thus, you can add a watermark in Preview as text or an image. Preview lets you draw shapes and type text within them to create a watermark. You can also combine PDFs in Preview to view and edit them together.
Learn the two detailed methods to add a watermark to a PDF in the Mac Preview.
#1 How to Watermark a PDF in Preview on Mac for free by Adding Text
The basic ways to use Mac Preview to add a watermark to a PDF are to add watermark text. You can customize the text color and size to make it visually like a watermark.
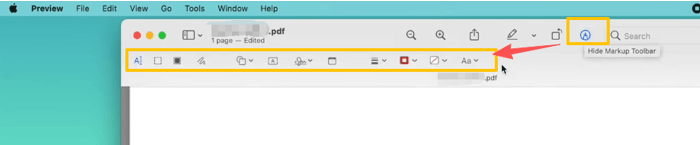
Step 1: Open PDF
Open your PDF in Preview, and click Show Markup Toolbar to show all the tools.
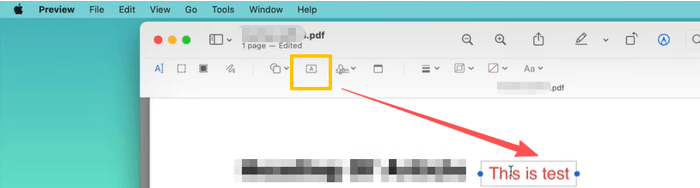
Step 2: Add Text
Select the text adding tool, insert a textbox, and type the watermark text.
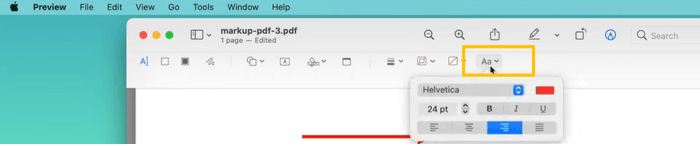
Step 3: Personalize Watermark
Click the Aa tool to adjust the font, text color, size, opacity, and other properties to ensure it looks like a watermark. For example, set the color to gray.
Step 4: Save the Watermarked PDF
You can copy and paste the text watermark to other pages. To make the watermark non-editable, use the print option to save the file as a new PDF.
#2 Add a Watermark in a PDF on Mac in Preview for Free by Markup Tools
This section shows how to add a watermark to a PDF on a Mac in Preview by creating it manually. Specifically, create a watermark-like thing.
Step 1: Open your PDF
Open the PDF in Preview, and expand the markup toolbar.
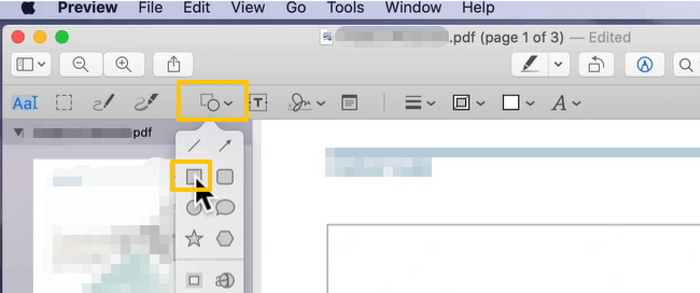
Step 2: Add Watermark Shape
Click the shape tool to select the rectangle, then insert it as your watermark border.
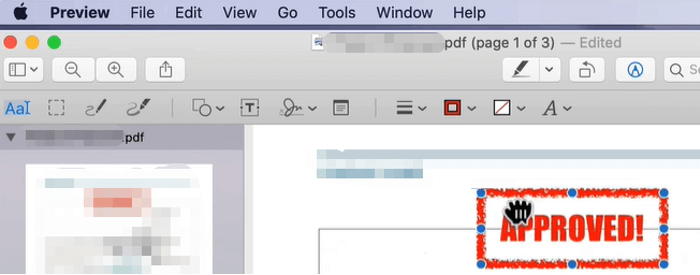
Step 3: Customize the Watermark Border
Adjust its border color to a watermark-like hue (e.g., red or gray). Change the fill color to fill nothing. Set the border thickness.
Step 4: Add Watermark Text
Double-click the watermark border and type your text in the middle. Select the text and change its font, size, color, and more parameters.
Step 5: Apply the Watermark
If you have a Trackpad, use two fingers to rotate the watermark. Mac Preview lets you watermark other PDF files or PDF pages with the watermark using CMD + C and CMD + V.
You can add the image to your PDF in Preview by copying and pasting if you have an existing watermark graphic.
Add a Watermark to a PDF on a Mac with SwifDoo PDF
SwifDoo PDF is a straightforward, painless offline way to add a watermark to a PDF on a Mac. The lightweight software makes file management and editing child's play for any user. It lets you precisely put the watermark where you like while keeping the document intact without format changing. You can apply text or image watermarks and customize their size, position, and appearance. Also, SwifDoo PDF allows you to print and encrypt your PDFs.
Step 1: Launch SwifDoo PDF for Mac to open the PDF you want to add a watermark to.
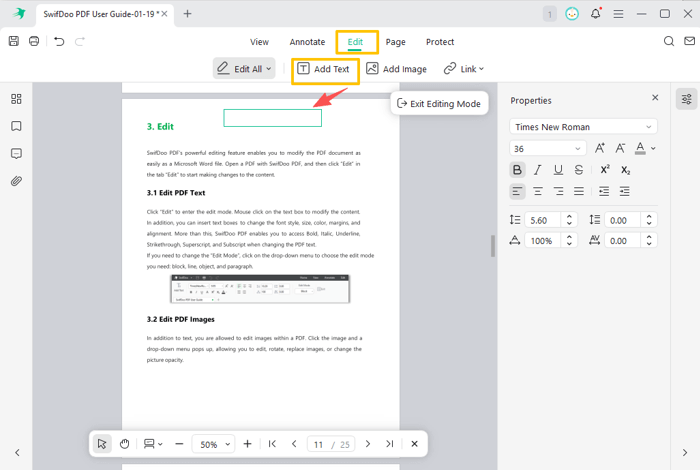
Step 2: Choose Edit > Add Text, then click the PDF to add the text for your watermark.
Step 3: Right-click the textbox, choose Properties, and set the text font, size, color, and other options.
Step 4: Drag the box to the target watermark position. You can copy the watermark text to paste and apply the watermark to other pages.

If you saved a watermark, choose Add Image under Edit to add a watermark on a PDF on a Mac.
To remove the watermark from a PDF on Mac, select the watermark text or image, then press Delete.
If you wish to embed the watermark into the PDF to become unremovable, click the Printer button, and print to save the PDF.
Add a Watermark to a PDF on Mac Using Automator
Adding a watermark to a PDF is best done with Automator, especially for a multi-page PDF and multiple PDFs. Apple Inc. developed this utility to automate tasks, provided you've created an action. You can also use Automator to split, convert, and merge files.
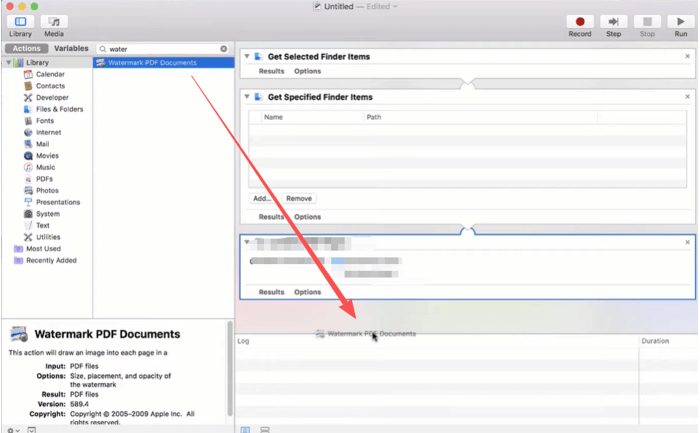
Step 1: Open Automator and choose Workflow in the pop-up window.
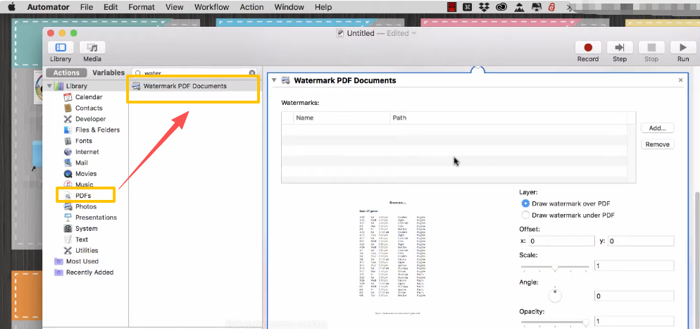
Step 2: Select PDFs under Actions, and search for and choose Watermark PDF Documents.
Step 3: Drag this action to the workflow to the right side.
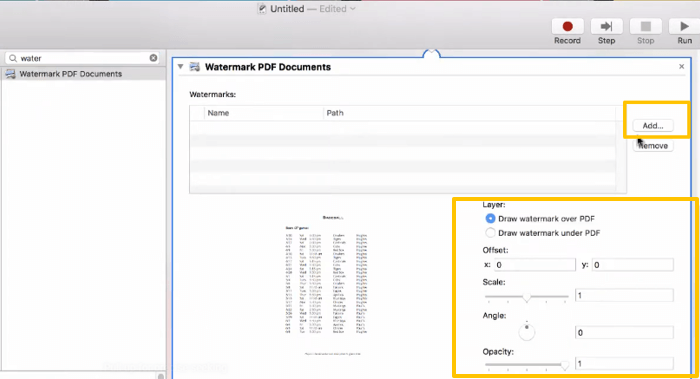
Step 4: Click Add to add your watermark, then configure its layer, scale, rotation angle, opacity, and placement coordinates.
Step 5: Click Files and Folders from the left side, and select Move Finder Items and drag it to the right panel.
Step 6: Select the export folder, and then go to File at the top to choose Save to save the added watermark workflow with a name.
Step 7: Once the quick action is created, right-click your PDF in Finder and select Quick Action > the named watermark workflow to add watermarks to the PDF.
Final Words
Without turning to external applications, the preinstalled Preview and Automator help add a watermark to a PDF on macOS. If you want to do that without a curve, consider a professional-grade PDF editor.
However, watermarks cannot prevent someone from stealing your content since they can view your document. If your purpose is to protect the PDF content from abuse, another best way is to encrypt the PDF with a password that restricts unauthorized viewing.
If you have PDF editing needs, SwifDoo PDF for Mac is here to boost your productivity.