There are several key benefits of flattening PDFs, such as protecting your annotations and preparing your files for sharing. You can edit text in Bluebeam without difficulty, but flattening PDFs locks your changes and prepares the file for sharing or printing. Knowing how to flatten PDFs can streamline your workflow and help prevent unintended changes.
How to Flatten a PDF in Bluebeam Revu
Flattening a PDF in Bluebeam Revu secures every annotation, markup, edit, and comment, making sure your changes remain intact and the document is fully ready for sharing or printing. The following section outlines three effective methods for flattening a PDF in Bluebeam efficiently and securely.
Method 1. Flatten All Markups in Bluebeam
With Bluebeam, you can flatten all markups in just a few clicks, turning your annotations into permanent elements on the PDF. This method is perfect for protecting your work and preventing accidental changes.
Let us learn how to flatten all markups in Bluebeam in just a few clicks.
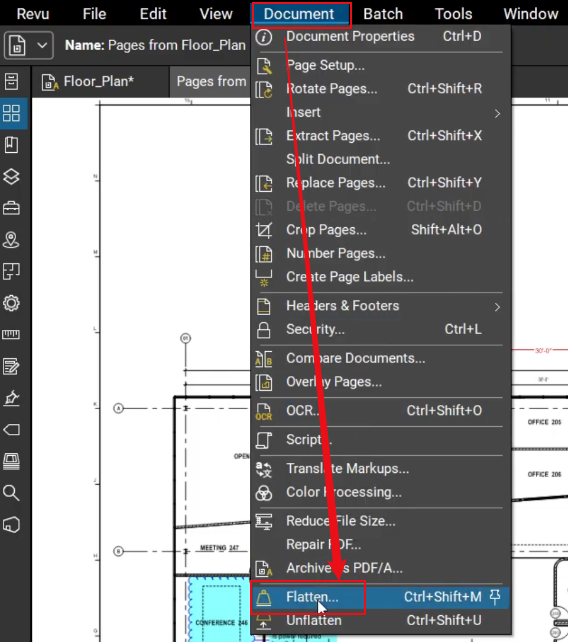
Step 1. Open Bluebeam. Then navigate to Document > Flatten Markups or simply press Ctrl + Shift + M. The Flatten Markups dialog box will then appear. Alternatively, open Batch and select Flatten Markups.
Step 2. At this stage, add PDFs to the workflow by picking an option from the Add menu.
- Files. This option allows you to add individual files from a local or network drive. Selecting it will launch the Open dialog box. Go to the folder where your files are stored and select them.
- Open Files. This option adds all files that are currently open in Revu.
- Open Set. This option adds all files included in the current Set.
- Folder. This option adds all files from a chosen folder on a network or local drive, excluding any files in its subfolders. Choosing this option opens the Select Folder dialog box. Browse to the folder you want and select it.
- Folder and Subfolders. This option adds all files from a selected folder on a network or local drive, including every file in its subfolders. Choosing this option opens the Select Folder dialog box. Locate the folder you wish to use and select it.

Note. The flattening process follows the sequence of PDFs as they appear in the Files list. You can change the sequence of files by dragging and dropping them.
Step 3. Choose Select All Markups along with any other flattening options you need.
To target specific pages for flattening, pick an option from the PDF’s Pages dropdown menu.
- All Pages. Applies the range to include all pages.
- Current. Applies the range to just the current page. The current page number is shown in parentheses, such as Current (2) when you are on page 2.
- Selected. Applies the range to only the currently selected content. This option is available only if you selected pages before running the command.
- Custom. Applies a custom page range. Selecting this option makes the field behave like a text box. Clear any existing text in the field and type the page or pages you want to print. To enter a custom range:
- Use a dash between page numbers to include those pages and all in between.
- Use a comma to list non-consecutive pages. For example, 1-3, 5, 9 includes pages 1, 2, 3, 5, and 9.
Step 4. Lastly, press Flatten to complete the process.
Method 2. Flatten Selected Markups Only
Bluebeam allows you to control which markups to flatten, keeping others open for further changes. You gain greater flexibility by controlling selected elements without modifying the entire file.
Let us check how to flatten only the selected Markups in Bluebeam.
#Flatten with Default Flattening Settings
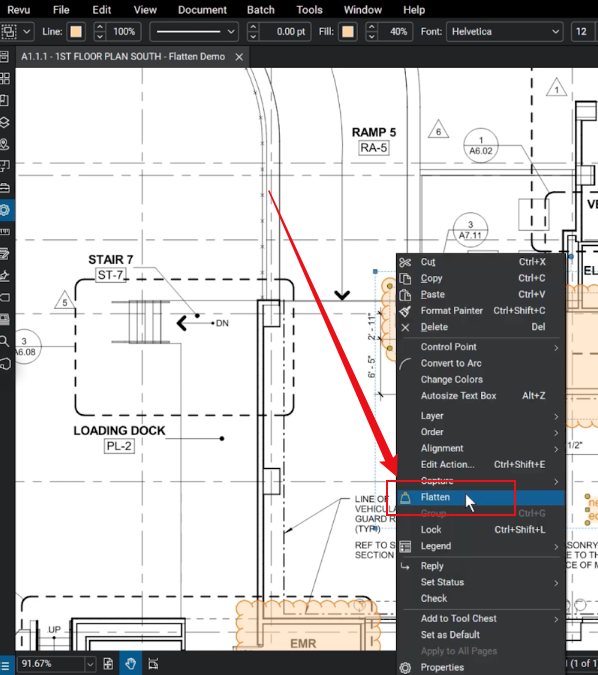
Step 1. Open Bluebeam. Next, choose one or more markups either in the workspace or from the Markups List.
Step 2. Right-click on a markup and choose Flatten from the menu to flatten it.
The selected markups are automatically flattened with Revu’s default settings, yet they can be unflattened later if needed.
#Flatten with Configurable Flattening Settings
Step 1. Launch Bluebeam. Then choose one or more markups from either the main workspace or the Markups List.
Step 2. Go to Document > Flatten Markups. Or press Ctrl + Shift + M. The Flatten Markups dialog box appears.
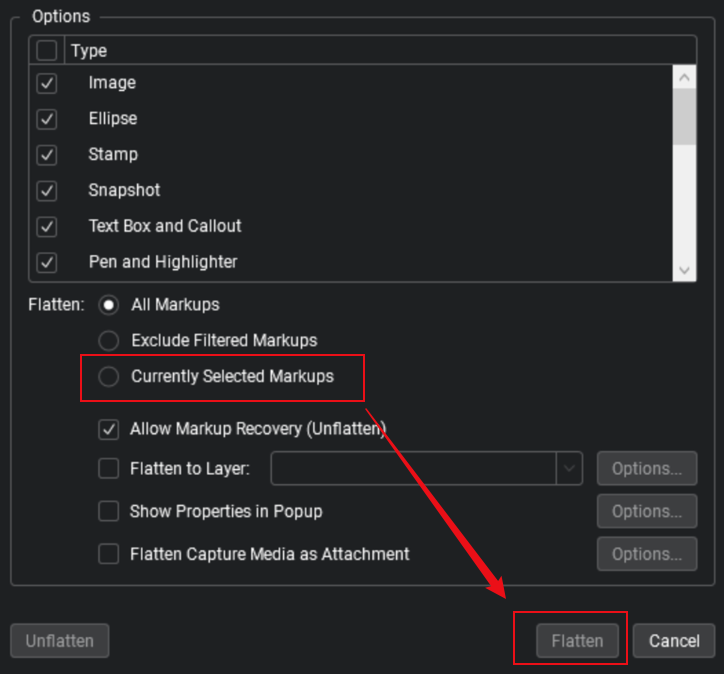
Step 3. Select Currently Selected Markups and any other desired flattening settings.
Step 4. Click Flatten.
Method 3. Flatten a PDF When Printing
Flatten a PDF in Bluebeam during printing, which makes all markups permanent on the output file. Using this method keeps your annotations preserved for sharing or distribution.
Step 1. Open your PDF in Bluebeam Revu.
Step 2. Press Ctrl + P (Print). And choose a printer:
- Bluebeam PDF
- Or, Microsoft Print to PDF.
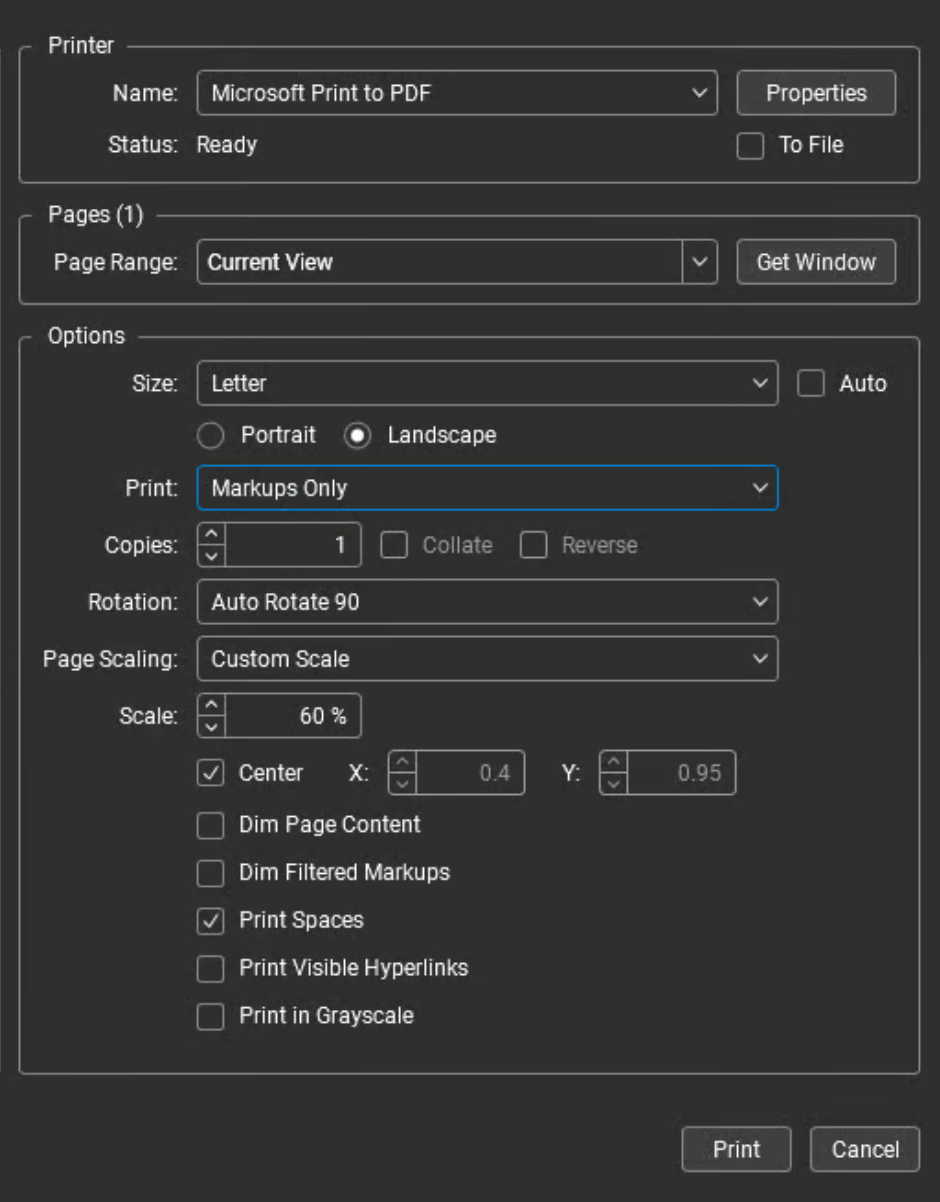
Step 3. Then, tap Print.
Step 4. Once done, save the new file. Your new PDF file will be flattened automatically.
Bluebeam Flatten vs Lock vs Burn Markups
Bluebeam offers three ways to secure your annotations—Flatten, Lock, and Burn Markups—each serving a different purpose depending on whether you want edits to remain possible or permanently fixed. Knowing the differences allows you to select the best method for your workflow.
Check out this table to better understand the three methods.
|
Feature |
Editable Later |
Permanent |
Best Use Case |
|
Flatten |
No (unless recovery enabled) |
Yes |
Finalizing PDFs while preserving markups visually. |
|
Lock |
Yes |
No |
Keeping annotations protected but editable for now. |
|
Burn Markups |
No |
Yes |
Permanently embedding markups into the PDF for sharing or printing. |
How to Unflatten a PDF in Bluebeam
There are times you may need to modify a finalized file, which is why learning to unflatten a PDF in Bluebeam matters. This allows you to restore annotations and markups for further editing without losing your work.
Let us find out how to unflatten a PDF in Bluebeam.
Step 1. Open a previously flattened PDF in Bluebeam Revu.
Step 2. Then, navigate to the Document menu at the top and click Unflatten… to access the settings window for unflattening PDFs.
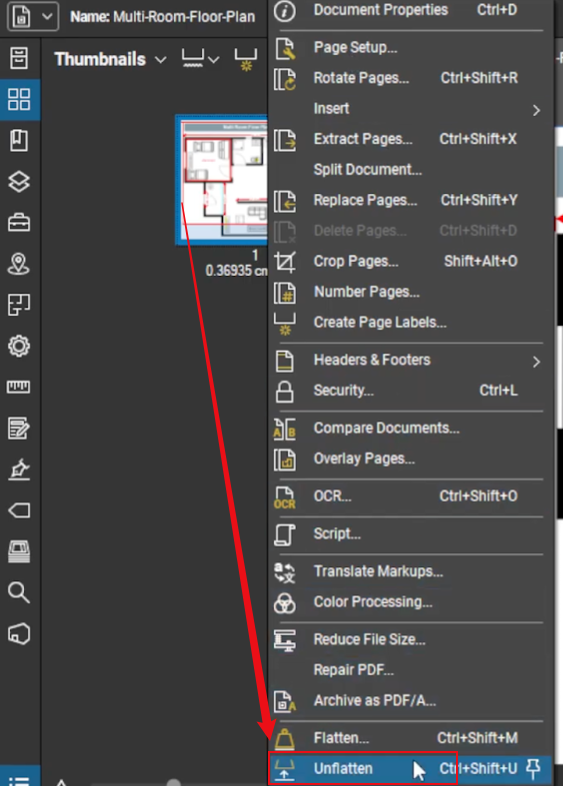
Alternatively, go to Document > Flatten (or press Ctrl+Shift+M) to open the dialog box, then click the Unflatten button.
Step 3. Then, a dialog box will open so you can pick which pages or markups to unflatten.
Step 4. To complete the process, click Unflatten at the window’s bottom-right to re-enable markup editing.
Alternative Way to Flatten a PDF in SwifDoo PDF
We have outlined different methods for flattening and unflattening a PDF in Bluebeam Revu, but some users could find the procedure confusing or slow, particularly if they lack Bluebeam. Those who want to flatten a PDF without Adobe Acrobat or Bluebeam can use an alternative tool to simplify the process and save time. Fortunately, SwifDoo PDF can come in handy to address this need.
SwifDoo PDF is a reliable PDF flattener that lets you quickly lock annotations, markups, and edits without the complexity of other software. Combining an intuitive interface with robust functionality, SwifDoo PDF makes flattening PDFs straightforward, making it a preferred tool for both professional and casual users.
Let's find out how to flatten a PDF using SwifDoo PDF in just a handful of clicks.
Step 1. Get SwifDoo PDF from the official website and install it on your computer. And then launch the application.
Step 2. Next, open the PDF file you want to flatten in SwifDoo PDF.
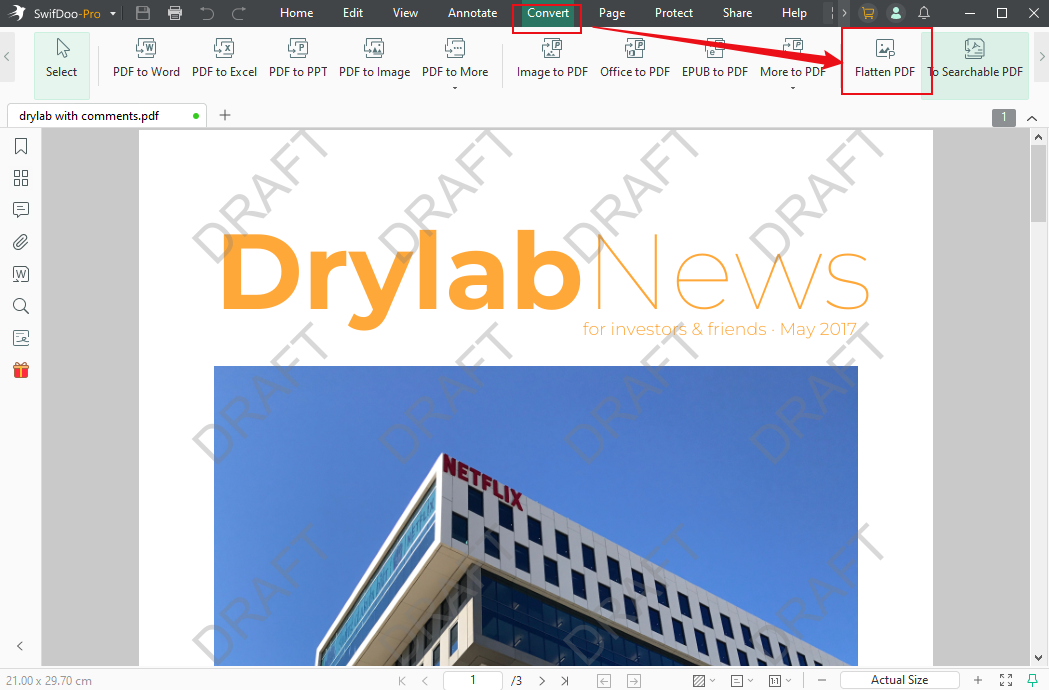
Step 3. From the top menu, open the Convert tab and choose Flatten PDF.
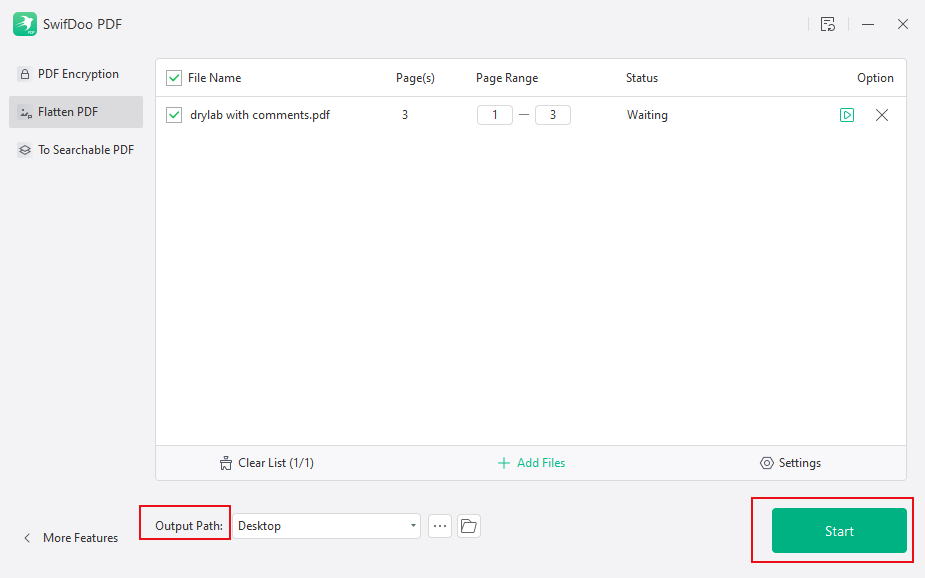
Step 4. Then select the output path to save the PDF, and then click Start. Wait for the process to complete. Upon completion, the file will be saved to the chosen directory.
Conclusion
Flattening PDFs helps protect annotations, complete documents, and prevent unintended changes. Now that you know how to flatten a PDF in Bluebeam with various techniques, you can select the approach that aligns best with your workflow. Whether in Bluebeam Revu or an alternative such as SwifDoo PDF, knowing how to flatten PDFs ensures your files are professional, secure, and share-ready.