
Transfer Photos from iPhone to Mac via AirDrop
AirDrop is a wireless file-sharing technology that allows users to quickly transfer files between nearby Apple devices, including iPhones, iPads, and Macs. You can use it to transfer various files, such as photos, videos, documents, and even websites. Let's see how to transfer photos from iPhone to Mac wirelessly with this app.
Step 1: Tap Go > AirDrop in the Finder app on your Mac, and switch to Everyone in the Allow me to be discovered by field;

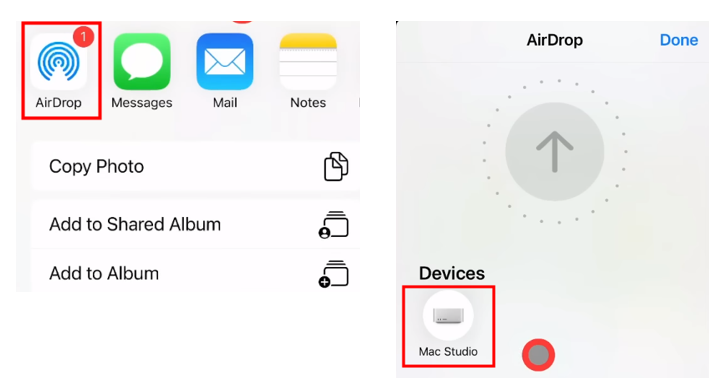
Step 2: Launch Photos on your iPhone, select the photos you want to upload from iPhone to Mac, and hit Share;
Step 3: Choose Airdrop, then select your device in the new window to transfer pictures from iPhone to Mac.
If the sender and receiver use different Apple IDs, the system will ask for permission before transferring.
Transfer Pictures from iPhone to Mac via iCloud
iCloud is a storage tool developed by Apple Inc. that stores and accesses your files in the cloud. If you set up iCloud Photos to sync your images, you'll be able to access them from any Apple device on the go. It can be used as an alternative way to transfer photos from iPhone to computer. Before we start, make sure you have enough iCloud storage to store all your images.
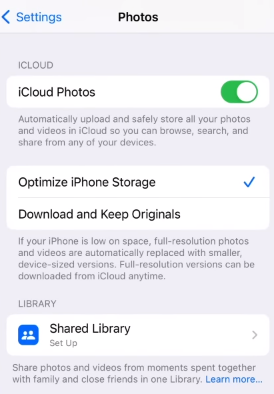
Step 1: Activate the iCloud Photo Library on your iPhone and Mac;
On iPhone, go to Settings > [your name] > iCloud > Photos, and turn on the iCloud Photo Library.
On Mac, go to System Preferences > iCloud > Options next to Photos, and toggle on the iCloud Photo Library.
Step 2: Launch Photos on your Mac. Leave some time for your photos to sync from iCloud to your Mac. Once the synchronization is complete, you can see all your iPhone photos in the Photos app on your Mac.
Import Photos from iPhone to Mac Using Photos
If you want to quickly import photos or videos from your iPhone to your computer, the Photos app will be a nice choice. Let's dive into how to transfer photos from iPhone to Mac with it.
Step 1: Connect your iPhone and Mac with a USB cable, then click Trust on your iPhone so that you can synchronize photos to your Mac;
Step 2: Launch Photos on your Mac if it doesn't open automatically, and go to the Import tab;
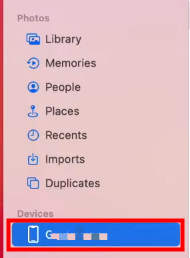
Step 3: Tap your iPhone device on the left side and select the photos you want to import;
Step 4: Hit Import x Selected to move photos from iPhone to Mac.

Upload Photos from iPhone to Mac with Image Capture
Image Capture is a prebuilt MacOS program that lets users sync photos and videos from cameras, iPhones, iPads, and other devices to their Mac computers. It provides a convenient way to import, organize, and manage digital images and videos. Let's dive in how to transfer photos from iPhone to Mac with Image Capture.
Step 1: Connect the device containing the images or videos to your Mac using a cable or wireless connection;
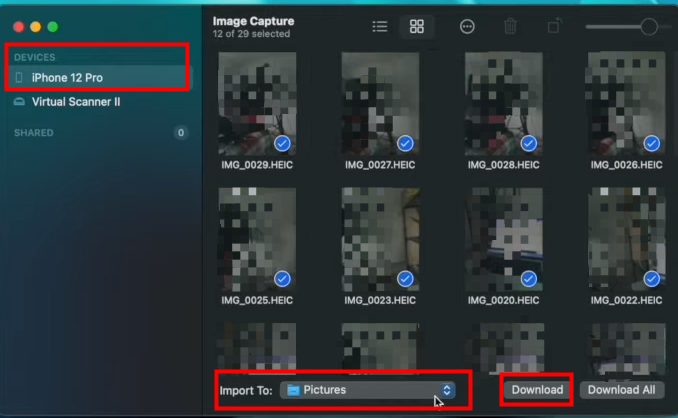
Step 2: Open Image Capture on your Mac and select your iPhone from the Devices list;
Step 3: Preview and select the images you want to import, decide where to save them, and click Download to import the selected pictures to your Mac.
Bonus Tip: Convert Photos to PDF for Easier File Management
After importing photos from iPhone to Mac, we suggest you convert photos to PDF. That's because PDF is a share-friendly and print-friendly file format.
On Mac, you can easily convert images with the built-in Preview app. Simply open your images with Preview, tap File > Export, and select PDF as the output file format. After that, you can edit PDFs in Preview.
However, Preview only provides some basic functions. If you want to work with PDFs more professionally, try SwifDoo PDF for Mac! With this software, you can view PDFs in various tools, edit and annotate PDFs, add and delete pages, and password-protect PDF files.

The Bottom Line
Transferring photos from iPhone to Mac is a simple process that can be done using AirDrop, iCloud, the Photos app, or Image Capture. With a few clicks, you can ensure that your precious memories are safely stored on your Mac. We hope this article has been helpful. If you have any more questions, don't hesitate to contact us via social media platforms.