What Is Microsoft Print to PDF?
Microsoft Print to PDF is a virtual printer in Windows. It allows you to save documents as PDF files without using any extra software. The Microsoft PDF printer doesn't send your files or documents to a physical printer. Instead, it saves it as a PDF on your device itself.
However, in some cases, you may find that Microsoft Print to PDF is missing. If this issue occurs, you might need to manually install it. In the later sections of our blog post, we have shared the 5 ways that you can follow to add and install Microsoft Print to PDF and get it working again on your system.
Way 1: How to Add Microsoft Print to PDF in Settings
Microsoft Print is among the best PDF printers available by default in Windows. If you wonder where your Microsoft Print to PDF went, don't worry. It's still on your computer. You can easily add it back using the Settings menu in just a few clicks.
Let's see how to add and install Microsoft Print to PDF on Windows via Settings.
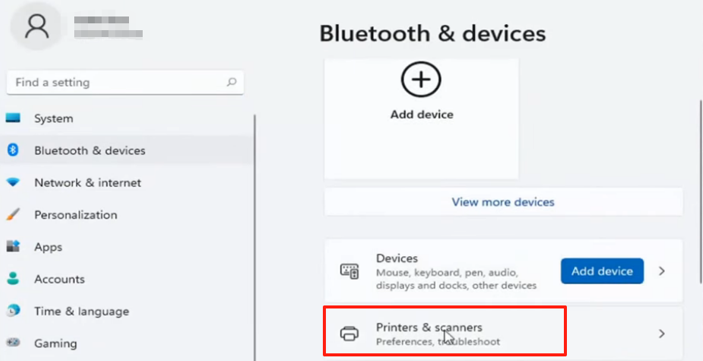
Step 1: Open Settings, and click Bluetooth & devices > Printers & scanners.
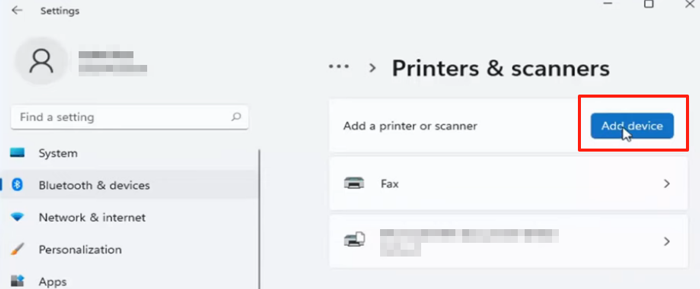
Step 2: Click Add device and wait for a few seconds to click Add Manually below.
Step 3: Choose Add a local printer or network printer with manual settings > Next.
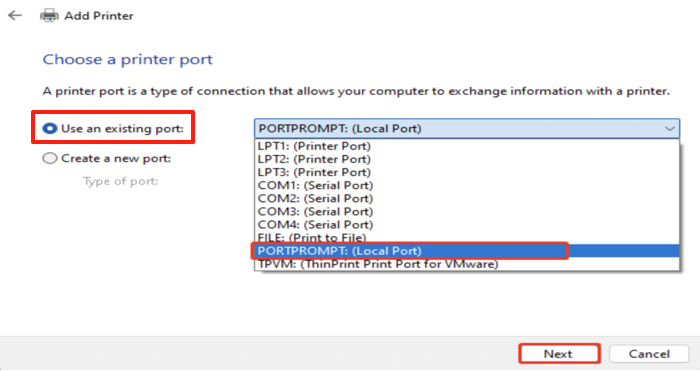
Step 4: Choose the Use an existing port option, click the drop-down button to select PORTPROMPT: (Local Port), and click Next. Otherwise, select PDF (Local Port).
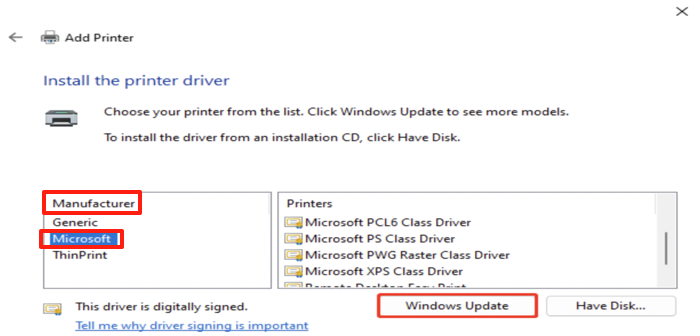
Step 5: Choose Manufacturer > Microsoft, select Microsoft Print to PDF from the list of Printers, and proceed to add the Microsoft Print to PDF printer.
Click Windows Update if the printer is not showing.
Step 6: Name the Microsoft PDF printer and get the print to PDF driver back. Tap Finish once the printer is added successfully.
Way 2: Reinstall Microsoft Print to PDF from Device Manager
Another practical way to reinstall Microsoft Print to PDF is by utilizing Device Manager. Here, you can manually add the printer driver and restore the built-in PDF printing feature to your system.
Here's how to add and install the Microsoft Print to PDF printer in Windows using the Device Manager.
Step 1: Search for and open Device Manager from the Windows search bar.
Step 2: Click Print Queues, and right-click the Microsoft Print to PDF option to choose Uninstall device.
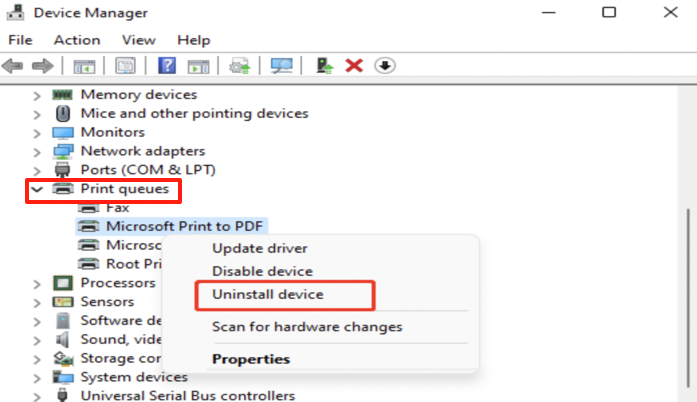
Step 3: Restart your PC to let Windows automatically install the Microsoft Print to PDF driver.
Way 3: How to Install Microsoft Print to PDF by Windows Features
If you are still seeking a viable way for “Microsoft Print to PDF driver download”, Windows Features can be your optimal choice. Just ensure it is selected in the Windows Features. Otherwise, it may not install on Windows 11. You can easily install it by turning on the feature through Windows Features settings.
Let's check how to add Microsoft Print to PDF to the printer list via Windows Features.
Step 1: Go to the Control Panel > Programs > Programs and Features, then click Turn Windows features on or off.
Step 2: Scroll down Windows features in the pop-up window to find and check the Microsoft Print to PDF box, and hit OK.
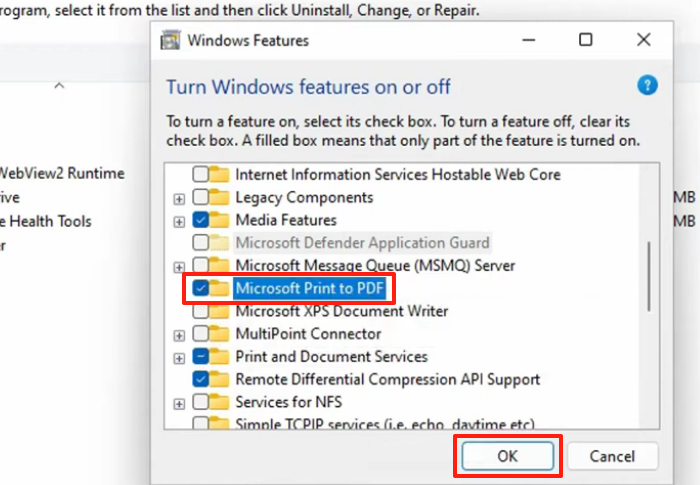
Step 3: Restart your computer. This will start the Microsoft Print to PDF driver installation automatically.
Way 4: How to Add Microsoft PDF Printer Using Command Prompt
At times, you may encounter the issue of Microsoft Print to PDF not working arise. Or, it may be missing entirely. You can utilize the Command Prompt to restore it successfully.
Here's how to add Microsoft Print to PDF and install it.
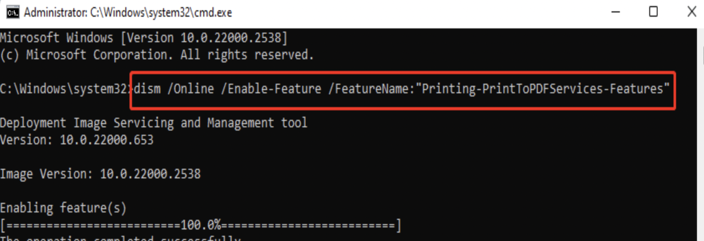
Step 1: Hold the Windows logo + R keys, type Cmd in the Run dialog box, and tap the Ctrl + Shift + Enter keys.
Step 2: Type or paste the below-given command. And click Enter.
"dism /Online /Enable-Feature /FeatureName:"Printing-PrintToPDFServices-Features"
Way 5: How to Add Print to PDF Printer on Windows via PowerShell
Lastly, you can use PowerShell to add the Microsoft Print Printer manually. PowerShell is a built-in Windows tool. It can help you perform tasks with specific command lines.
Check out the quick steps to add and install Microsoft Print to PDF via PowerShell.
Step 1: Type PowerShell in the Windows search box, and right-click on Windows PowerShell to select Run as administrator.
Step 2: Input the below-given command, and tap the Enter key. This will enable and start the Microsoft Print to PDF installation.
"Enable-WindowsOptionalFeature -online -FeatureName Printing-PrintToPDFServices-Features -All"

Why is Microsoft Print to PDF Not Showing?
If Microsoft Print to PDF is not showing, you might wonder where it went. Well, it's still in your device, but possibly disabled or corrupted. However, there may be many more underlying causes. Once you are aware of the plausible reasons, you can easily add and reinstall Microsoft Print to PDF to recover or fix it in minutes.
Here's a list of several reasons why Microsoft Print to PDF is not available or is not showing.
- The feature is available only for Windows 10 or later versions
- The Print to PDF feature is not enabled
- The printer driver is outdated
- There are pending print jobs requiring you to clear the print queue
- Windows update issues
- System file corruption
Bonus: Microsoft PDF Printer Alternative to Convert Files to PDFs
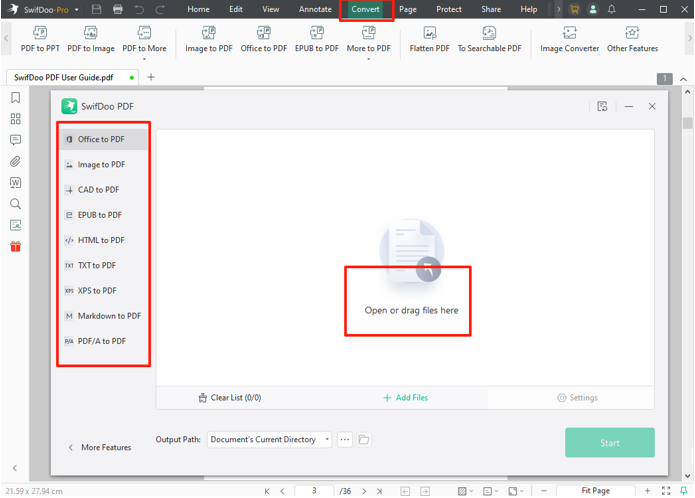
You can add and install Microsoft Print to PDF using any of the ways mentioned above. However, there may be times when the Microsoft PDF Printer option may fail to show. In such a case, use SwifDoo PDF to convert files to PDFs. It can convert your PDFs to any needed format while maintaining the formatting. Besides files and documents, it also supports image conversions. SwifDoo PDF also has an image compressor to reduce the file size after conversion. Undoubtedly, it is an excellent choice for anyone needing more than just a basic PDF printer.
Other main SwifDoo PDF Features
- Print and convert to PDF or other file formats from various documents quickly and batch conversion that Microsoft printer can't do.
- Edit, merge, and annotate PDFs with ease
- Change the themes and PDF display modes
- Read the document content out loud to multitask
- Find, search, and translate the PDF text with ease
- Supports AI for advanced PDF-handling tasks
Conclusion
This article offers a full introduction on how to add the Microsoft Print to PDF printer driver to reinstall or enable it. The virtual printer is so useful that you should take advantage of it for creating PDF documents for free. It even lets you set the page range, page size, page color, layout, and more options for a perfect page look. Figure out the five workarounds when you don’t see it in the printing window and printer list.