As digital subscriptions and online services continue to grow, spam and unwanted emails have become a common problem for Gmail users. When your inbox fills with promotional emails, newsletters, and phishing attempts, it becomes harder to locate important messages on time. A cluttered inbox can hinder your workflow while also putting you at a higher risk of security concerns. That’s why taking steps to filter, organize, and block unwanted emails is important for maintaining a well-functioning inbox.
Here’s a quick summary of the methods discussed in this guide:
- Blocking senders
- Blocking emails using filters
- Blocking entire domains
- Unsubscribing from mailing lists
- Reporting spam emails
How to Block Emails on Gmail – Desktop
If you’re using Gmail on a computer, it’s easy to manage unwanted messages directly from your inbox. Knowing how to block someone on Gmail on the desktop version lets you easily stop emails from specific senders. This method is simple and effective, and it keeps your inbox clutter-free.
Let us see how to block an email on Gmail on a desktop.
Step 1. Launch Gmail and open a message from someone you want to block.
Step 2. Select the three vertical dots next to the Reply button at the upper-right corner of the message.
Step 3. From the dropdown, choose 'Block [sender's name]'.
![Click the three-dot icon and select the Block [sender’s name] option in Gmail](https://img.swifdoo.com/image/how-to-block-emails-on-gmail-1.png)
Step 4. The 'Block this email address' pop-up box will appear on your screen. Click Block to officially block the sender.
When you block someone on Gmail, their future emails will be directed to your Spam folder, ensuring they don't clutter your inbox. Since no notifications are sent, you can stay focused and keep unwanted emails from distracting you. Your current emails from that sender won’t be changed and will stay in your inbox unless you choose to move them to Spam or delete them in bulk.
How to Block Emails on Gmail on Mobile
Managing your inbox is easy on mobile, with blocking emails just as simple as on a desktop, so you can do it from anywhere. It works the same on Android and iOS devices, so that you can use the same method regardless of your device. Using this approach, you can quickly block unwanted emails on Gmail on phone while keeping your inbox clean and organized.
Let us check out how to block unwanted emails on Gmail on mobile phones in just a few clicks.
Step 1. Launch the Gmail app on your phone, whether it's iOS or Android.
Step 2. Open an email from the sender you prefer to block.
Step 3. Click the three horizontal dots beside the Reply button at the top-right corner of the message.
Step 4. Tap Block "[sender name]".
![Tap the Block [Sender’s name] option in the Gmail app](https://img.swifdoo.com/image/how-to-block-emails-on-gmail-2.png)
As a result, all future emails from that sender will be automatically sent directly to your spam folder.
How to Automatically Block Emails in Gmail Using Filters
Using Gmail email filters, you can automatically organize incoming emails based on factors such as sender, subject, or keywords. These filters let you organize, label, or delete emails automatically, eliminating the need to do it by hand. With this method, you can block unwanted emails on Gmail automatically, helping keep your inbox organized and lowering the risk of missing crucial messages. Using filters gives you greater control over your email management and helps prevent spam from piling up.
Let us learn how to block unwanted emails on Gmail using a filter.
Step 1. Open Gmail on a desktop. And select the search bar Options icon (top right).
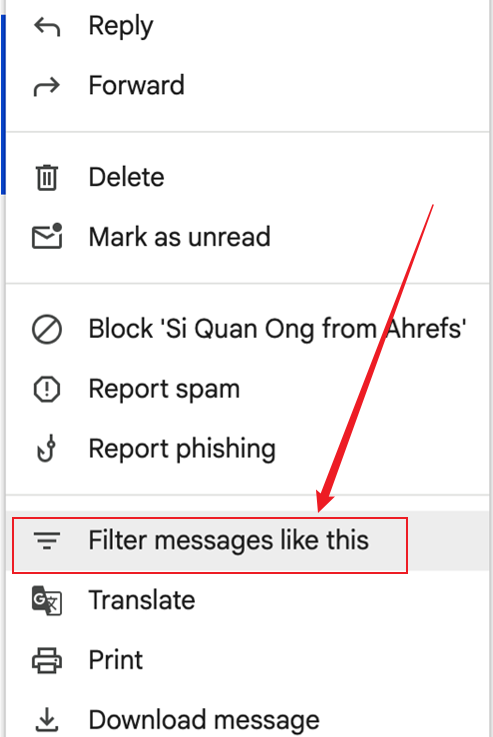
Or open a specific unwanted email and click the three vertical dots (More) > Filter messages like this.
Step 2. Set the criteria. In the "From" field, enter the email address, domain, or keywords you want to block.
- Tip 1: Use *@example.com to block all emails from a specific domain.
- Tip 2: Use keyword1 OR keyword2 to block multiple phrases.
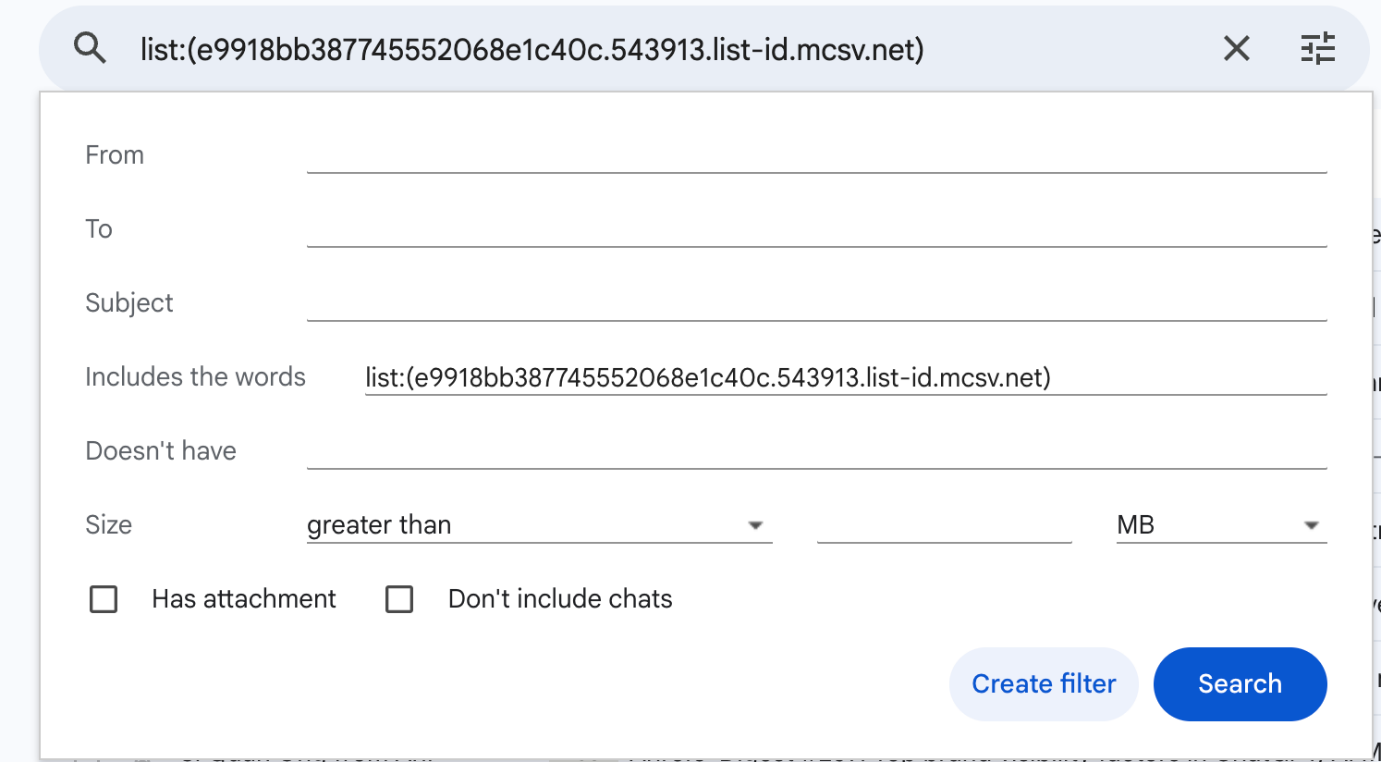
Note. To block multiple addresses, separate them with a vertical bar (|), which is usually above the backslash key. Once done, press Create filter.
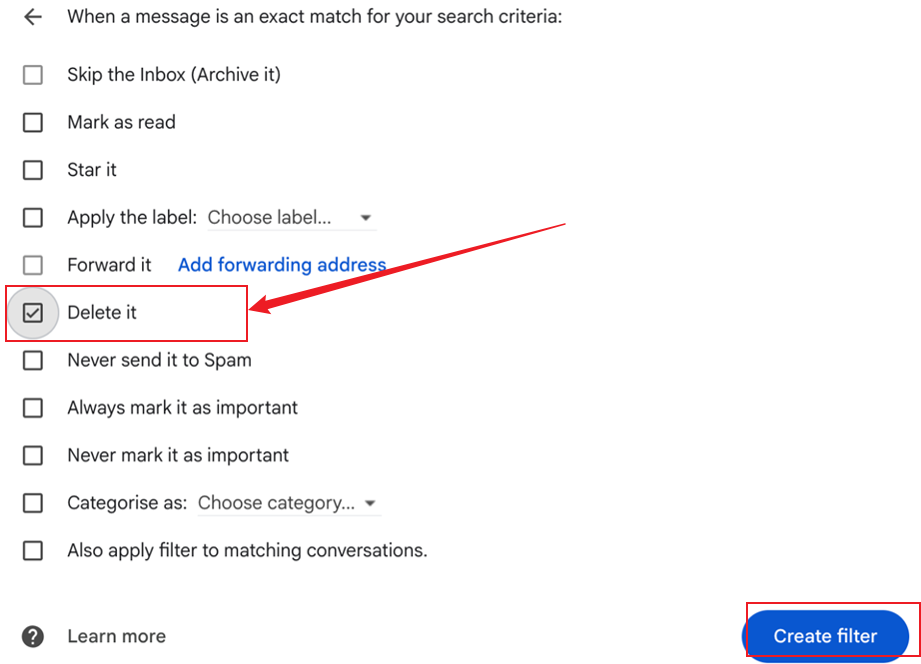
Step 3. Now, select the action Delete it in the search filter dialog box that appears.
Optional. Select 'Also apply filter to matching conversations' if you want to remove current emails from that sender.
Step 4. To complete the process, hit 'Create filter' once more to enable the filter.
All upcoming emails from the chosen sender(s) will now be automatically sent to the Trash folder.
How to Block Emails from an Entire Domain in Gmail
Blocking emails from an entire domain in Gmail stops all messages from a particular company or organization from reaching your inbox. When you receive repeated unwanted emails from multiple addresses within the same domain, such as newsletters or marketing content, this method proves useful. With domain blocking, you can cut down on spam and keep your inbox organized, prioritizing important messages.
Discover how to block emails from an entire domain in Gmail in just a few easy clicks.
Step 1. Open Gmail on a computer. Then, in the search box at the top, click the Show search options icon (three horizontal sliders).
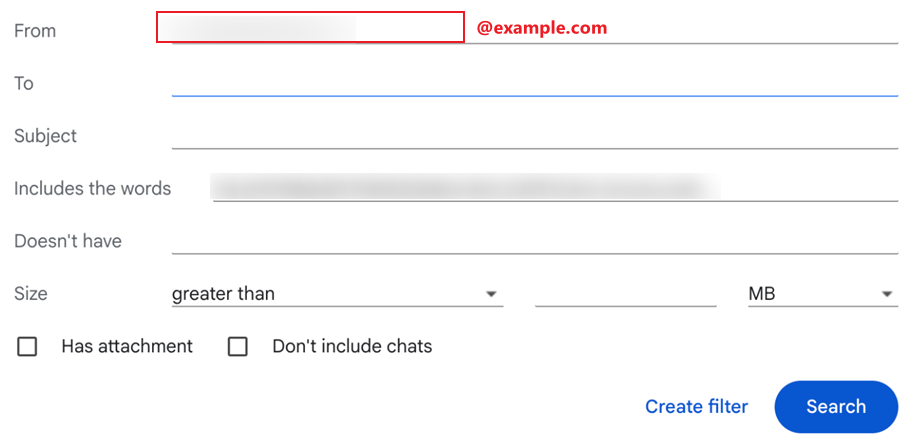
Step 2. In the From field, type the domain you want to block, such as example.com or @example.com.
Step 3. Click 'Create filter' located at the bottom of the search window.
Step 4. Check the box for Delete it to send these emails immediately to the trash.
- Optional. Select "Skip the Inbox (Archive it)" if you want to keep them but not see them.
- Optional. Enable 'Also apply filter to… matching conversations' to delete all current emails from that domain.
Then, click Create filter again.
Note. Now every email from that domain will be automatically blocked or deleted.
How to Unsubscribe from Emails in Gmail
To halt unwanted emails, unsubscribing from mailing lists is usually the simplest solution. Gmail often makes unsubscribing simple with a link placed at the top of promotional emails. This helps remove unnecessary clutter, so you only receive emails you truly want to read.
Let us learn how to unsubscribe from emails in Gmail in just a few clicks.
Step 1. Launch Gmail and head to your Inbox to find your messages.
Step 2. Locate the sender you want to unsubscribe from.
Step 3. Near the sender’s email, on top of the page, you should see an Unsubscribe button.

Note. When this doesn’t appear, the sender has not turned on this option.
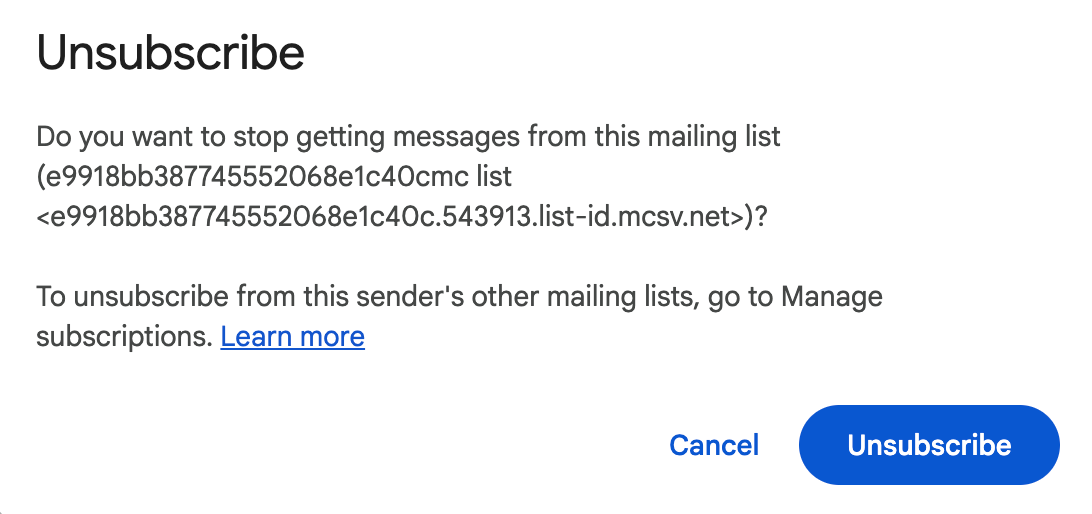
Step 4. A dialog box will quickly pop up asking you to confirm your decision. Select 'Unsubscribe' again to prevent further emails from this sender.
You should consider unsubscribing rather than blocking emails from legitimate sources, such as newsletters, updates, or services you once signed up for. When you unsubscribe, you stop receiving emails without tagging them as spam, reducing the risk of missing important emails while maintaining a respectful connection with the sender.
How to Report Spam Emails in Gmail
By reporting spam emails in Gmail, you help protect your inbox and contribute to improving Gmail's overall spam filtering system. By marking unwanted or suspicious emails as spam, you help stop similar messages from appearing in your inbox later. By doing this, you boost your account’s security and assist Gmail in better filtering spam.
Let us explore how to block spam emails on Gmail in only a few easy clicks.
Step 1. Open Gmail on your computer or mobile phone.
Step 2. Select the email you wish to report as spam.
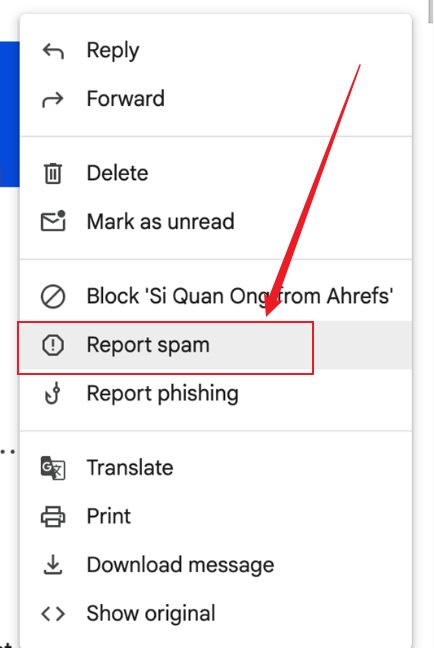
Step 3. After opening, click the three vertical dots in the top-right corner.
Step 4. Select Report spam in the dropdown menu. Afterward, click 'Report spam' again to finalize your decision.
How to Unblock Emails on Gmail
If you've blocked a sender before but want to receive their emails again, Gmail allows you to easily undo this action. Knowing how to unblock someone on Gmail allows their messages to return to your inbox without going to Spam. By doing this, you make sure important contacts or services you blocked by accident can still reach you.
Method 1. Unblock from an Email
Step 1. Open Gmail on your device.
Step 2. Search for an email from the blocked party in the Search bar at the top.
Alternatively, search your inbox for an email and, once located, open it.
Note. The message at the top of the email will let you know that the email address is blocked.
Step 3. Click the Unblock sender button on that message.
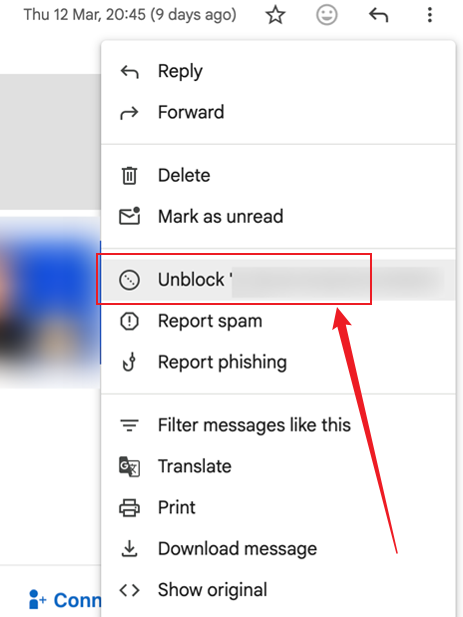
Step 4. Click Unblock in the Unblock this email address popup to confirm your action.
Method 2. Unblock from Gmail Settings
Step 1. Open Gmail on your device. Click the Settings gear icon in the top-right corner, then select 'See all settings'.
Step 2. Select the Filters and Blocked Addresses tab at the top under General.
Step 3. Scroll down to the "The following email addresses are blocked. Messages from these addresses will appear in Spam:" list.
Step 4. Locate the sender’s email address and select the 'Unblock' link next to it.
Then, click Unblock in the pop-up box to confirm.
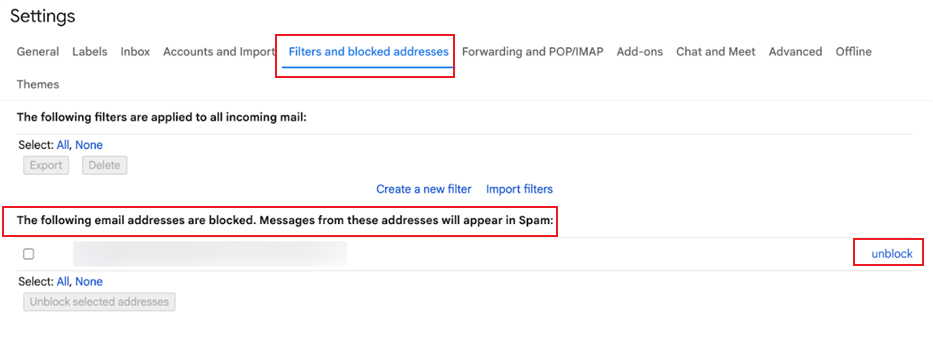
Note. You can choose 'All' to unblock every address at once.
Tips to Reduce Spam Emails in Gmail
Reducing spam in Gmail is key to a tidy inbox and staying protected from phishing and unwanted content. By adopting straightforward tactics, you can cut down on spam and improve how you manage emails.
Here are a few useful tips to reduce spam emails on Gmail.
- Use Filters. Use Gmail email filters to automatically sort or delete suspicious messages.
- Block Senders. Block unwanted emails from specific senders or entire domains.
- Unsubscribe. Unsubscribe from newsletters and promotional emails you no longer want.
- Limit Sharing. Avoid sharing your email address on untrusted websites.
- Report Spam. Report spam emails to help Gmail improve filtering.
- Enable 2FA. Enable two-factor authentication to protect your account from malicious senders.
- Review Subscriptions. To keep your inbox clean, regularly review and remove unnecessary subscriptions.
- Use Secondary Email. Create a secondary email for sign-ups and online forms to help keep your primary inbox secure and organized.
Final Wrap
Staying productive and secure relies on managing your inbox, and knowing how to block emails on Gmail is an important part of it. With methods like blocking senders, filtering emails, unsubscribing from irrelevant newsletters, and reporting spam, you can keep your inbox free of unwanted content. By using these methods, you can stay focused while keeping your personal data safe.