Splitting screen means you don't have to switch back and forth between pages because all the pages you need will be simultaneously displayed in the window on your screen. But how do we split the screen on a computer? In fact, almost all systems enable users to split screens easily with a built-in tool – Snap Windows.
In this article, we will give you a thorough explanation of how to split screen on Windows. With these methods, you can manage to split the screen to better process multitasking without breaking a sweat.
How to Split Screen on Windows 11/10
Before learning how to split screen on Windows, you need to enable snap windows on your device first. By doing so, you’re allowed to split screen on your computer. To activate the snap windows feature, follow these steps: Go to Settings > System; click Multitasking; and select Snap Windows.
By the way, the Snap Windows feature is renamed as Snap Assist in Windows 10.
Method 1. Choosing a Layout
Windows 11 enables you to split screen by just single-clicking one tab. There are a total of six different screen layouts that you can choose from, and you can split your screen up into four divided parts.
Before splitting screen, you must make sure that at least two windows or applications are opened. Let’s see the exact steps to split screen on Windows.
Step 1. Put your mouse over a window’s maximize/minimize button. You will see a box pop up under your cursor, which offers you six different ways to arrange your task windows;
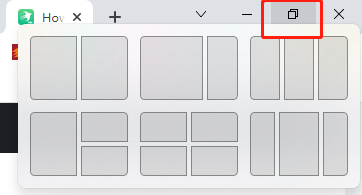
Step 2. Select the most suitable viewing mode. And your screen will be separated successfully.
In addition to using the mouse to open the box, you can also use some shortcuts to achieve this. By simply pressing the Windows key and Z simultaneously, you can open the layout box and choose a suitable layout.
Method 2. Using Shortcuts to Split Screen
There’s a much easier way to split screen on Windows 11 and you don’t need to call out the box in advance. Let’s see how to make it with the shortcut keys:
When working on one task, you can press the Windows key and the Left/Right arrow keys, so your screen can be put aside to the left or right side accordingly.
However, this method only applies to the situation when you need two screens. If you need to split your screen to three or four parts, this solution may not satisfy you.
Method 3. Using Your Mouse to Split Screen
Do you know you can split your screen with mouse only? With this method introduced, you don’t have to remember any shortcuts.
Step 1. Place your mouse on any empty area at the top of a window;
Step 2. Long press the left mouse button and click on the blank space. Drag the window to either the left or right side until you can't drag it anymore;
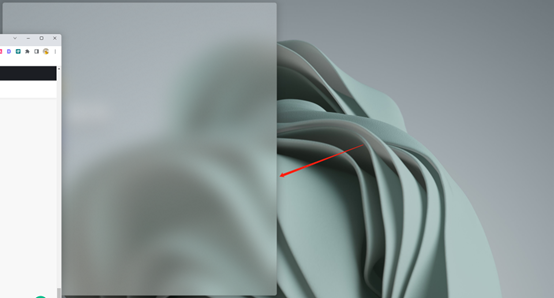
Step 3. Release the mouse, and the window you dragged will be automatically put to the side. It now fills half the screen;
Step 4. On the other side of the screen, all the other windows you've opened will be displayed in small views, so you can choose the one you need to fill in this side.
Now you’ve successfully split your screen into two screens. You can drag the dividing line in the middle to resize the two windows.
The method 3 not only works well on Windows 11, but also applies for Windows 10 system.
Split Screen on Windows 8, 8.1, and 7
On Windows 8 and 8.1, the same feature to help you split screen is Snap View. You also need to open it in the Settings app in advance. Please note that if you want to split your screen into three parts, each window needs to have a resolution of at least 1080p. Otherwise, only two screens are supported.
To split the screen on Windows 8 and 8.1, you can use method 3 mentioned above for Windows 11/10. Long press your left mouse button and drag the window to one side of the screen as far as possible, then select another window/app to fill the other half of the screen.
You can also resize the two screens by adjusting the dividing line, but unlike on Windows 11 or 10 (both two parts will be resized correspondingly), only one window will be resized when you move the dividing line, and the other one won't get changed automatically on Windows 8 and 8.1.
On a Windows 7 operating system, you can use the same approach to split your screen. The only difference is that you also need to drag the other half of the window manually. In addition, Windows 7 supports displaying two screens at most.
Bonus Part: How to Split Screen on a PDF File
After explaining thoroughly how to split screen on Windows, we also provide this part to help you split screen for a PDF file.
When checking a large PDF file that contains many pages, it's hard to remember all the content by only reading once. Moreover, you may need to scroll up and down to find the mentioned information or contrast the details of the same finger.
When it happens, a PDF viewer that supports splitting screen would be very helpful. Luckily, SwifDoo PDF is exactly the right one, which can help you read a PDF document with two divided screens.
Developed by an experienced team, SwifDoo PDF is an all-in-one PDF tool to help you solve all PDF-related issues. You can use it to edit, annotate, convert, and compress PDF files without a hassle. Without exaggeration, almost all the editing features you need to perform on a PDF file are offered by SwifDoo PDF.
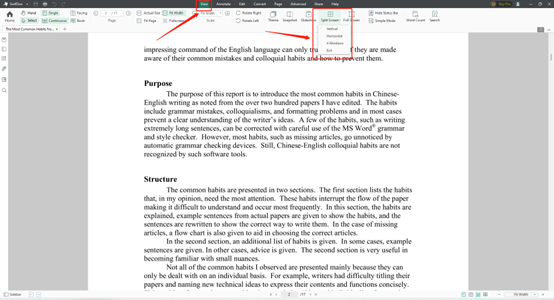
SwifDoo PDF offers three viewing modes to split screen on a PDF file: vertical, horizontal, and four windows, supports splitting screens in three ways: vertical, horizontal, and four windows. Both vertical and horizontal views can split your files into two screens.
Splitting screen on a PDF file is super easy. Check the following steps:
Step 1. Download and install SwifDoo PDF, then launch it;
Step 2. Open the target PDF file with SwifDoo PDF;
Step 3. Click View in the top navigation bar, then selects Split Screen.
Final Words
That’s all about how to split screen on Windows. Splitting screens is a super helpful feature when you’re multitasking. Windows 7 is the first version that supports splitting screens, so it’s relatively less inconvenient to use this feature. You can see that this feature is becoming much more mature.
Usually, it’s difficult to get a PDF tool that supports splitting screens for better reading large PDF files. But SwifDoo PDF makes it come true. If you find this feature useful, you can have a try on SwifDoo PDF. It’s a totally free and useful tool that can help you for real!