
Add Watermark in Word with SwifDoo PDF
With its powerful PDF converting feature, SwifDoo PDF lets you watermark virtually any document format as long as this program can convert it to PDF. Examples include images, EPUB files, and even Office documents.
You can insert a watermark in Word by choosing a pre-designed watermark or by unleashing your creativity and crafting your own. Text watermarks and custom image uploads are both supported.
Here’s how to add a watermark in Word using SwifDoo PDF.
Step 1: Open SwifDoo PDF, go to the Convert tab, and click Office to PDF to convert your Word document to PDF;

Step 2: Open the converted PDF file, tap Protect > Watermark, then choose a pre-made watermark or click Custom Watermark to create your own;
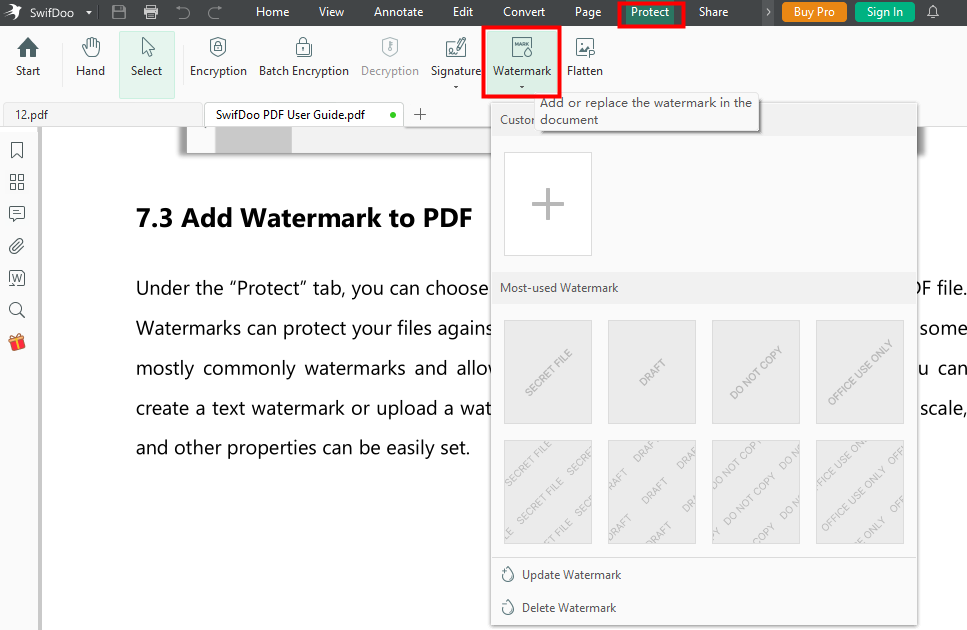
Step 3: Change the watermark’s position, color, scale, and other properties if needed. Tap the save icon to save the document.
After you add a watermark in Word in this way, you can update or delete the watermark in one click if needed.
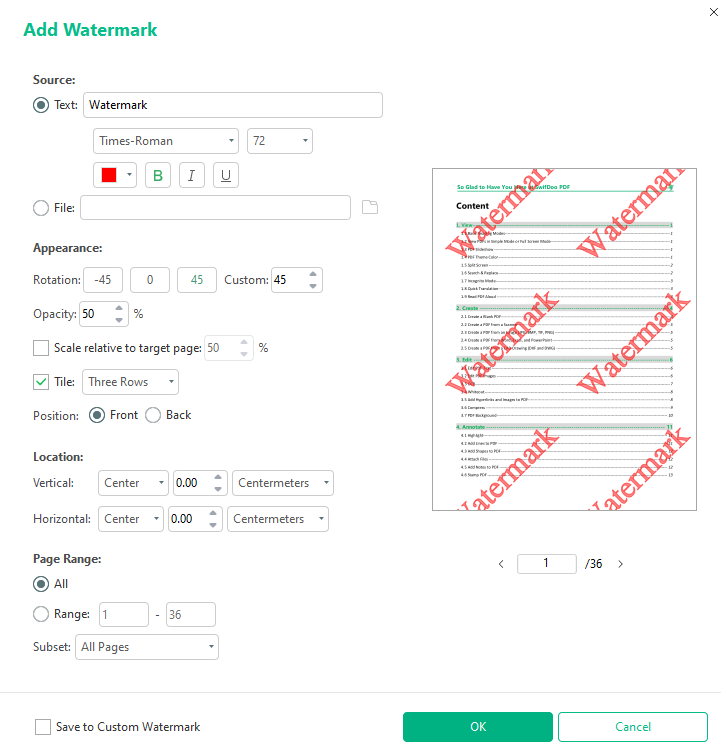
Making your own watermarks gives you complete control over their appearance and placement. You can adjust aspects like rotation, opacity, and tiling, and choose the exact location and page range where they appear. Additionally, you can save your custom watermark for future use.
In addition to adding watermarks in Word and other standard files, you can safeguard your files from unauthorized access using this program’s password protection capability. With the flatten PDF feature, you can make your document non-editable.
Add Watermark in Word Directly
Microsoft Word offers flexible options to add a watermark in Word files. You can choose a pre-designed Word watermark or create a custom text or image watermark. These watermarks can be applied to all pages or specific pages. You can even add multiple watermarks to a single Word document.
Add a Pre-Built Watermark
Word comes with a set of pre-built watermarks, such as "DRAFT," "CONFIDENTIAL," and "DO NOT COPY." These watermarks can be a quick way to mark your document. Let’s see how to add a watermark in Word in this way.
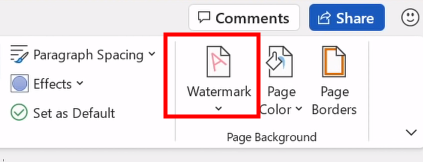
Step 1: Open your Word file with Microsoft Word and go to the Design tab;
Step 2: In the Page Background group, click on Watermark;
Step 3: Select the desired pre-built watermark from the list. Then, the program will add the watermark to all pages in Word.
If you want to change the size or position of the inserted watermark, double-click the header and footer section, then you can drag to edit the watermark.
To add a watermark in Word to a specific page, navigate to the particular page where you want to insert the watermark, access the Watermark options, right-click on the watermark you want to choose, and select "Insert at Current Document Position”. With this method, you can put different watermarks on each page.

Create and Insert a Custom Watermark
For a more personalized touch, you can make a watermark in Word by yourself. The watermark could include your logo, name, or even a custom message. Here’s how to add a watermark in Word this way.
Step 1: Open the Word document you want to add a watermark in, tap Design > Watermark > Custom Watermark;
Step 2: Choose Picture Watermark if you want to use an image or Text Watermark if you want to use text;
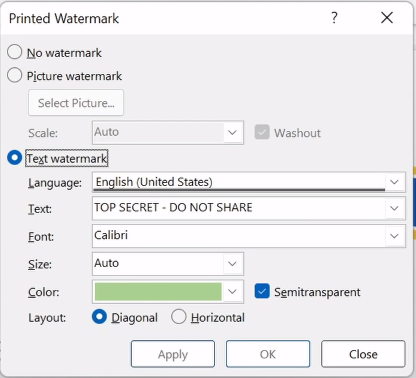
Step 3: If you chose Picture Watermark, select the image you want to use. You can adjust the transparency and scale of the image.
If you chose Text Watermark, type the text you want to use. You can format the text using the options provided.
Step 4: Click Apply to add the watermark to the Word document.
Final Words
Adding a watermark in Word is a breeze. Whether you prefer the simplicity of pre-designed options or the creative freedom of crafting your own with text or custom images, Word has you covered. If you need more comprehensive watermarking functionalities, SwifDoo PDF is a powerful tool worth exploring.